The beekeeping season draws to a close at the end of September – from October the weather becomes too cold to open up the hives. So the last weekend in September means the final inspection, and setting the hives ready for winter.
There’s not too much to do, but each task is important. First, check the queens: yes, Miriam and Florence are both present, and both still laying. Secondly, is there enough stored honey? Each hive will consume up to 20 kg of honey over winter, and they use this to maintain the internal hive temperature at around 20 °C. There’s plenty in both hives, so it’s time to put the roof on for the last time until spring.
Next, I take the Varroa (parasitic mite) trays out from underneath each hive – any Varroa mites that fall to the bottom of hive will pass through the mesh floor, and be unable to crawl back into the hive (this is a very good thing!).
Finally, I take out the entrance blocks, and replace each with a Mouse Guard. This is a perforated metal sheet that is pinned in place over the hive entrance, and each hole is large enough for a bee (and her cargo of pollen) to pass safely through. I don’t want any mice getting in over winter, so this is a vital precaution.
And that’s it – I’ll next open up in April (the exact weekend will depend on the weather), but until then the bees will form into a cluster to conserve warmth. They don’t quite hibernate, though they don’t move around much either, but they will vibrate their wing muscles to generate heat – the stored honey provides the energy for them to do this right through until spring. Until then, I wait.
Monday 5 October 2015
Sunday 30 August 2015
Harvesting the honey
The end of August is possibly the best time in the beekeeping year – it’s time to extract the honey! Here are a few photos from when Stewart and I gathered the harvest.

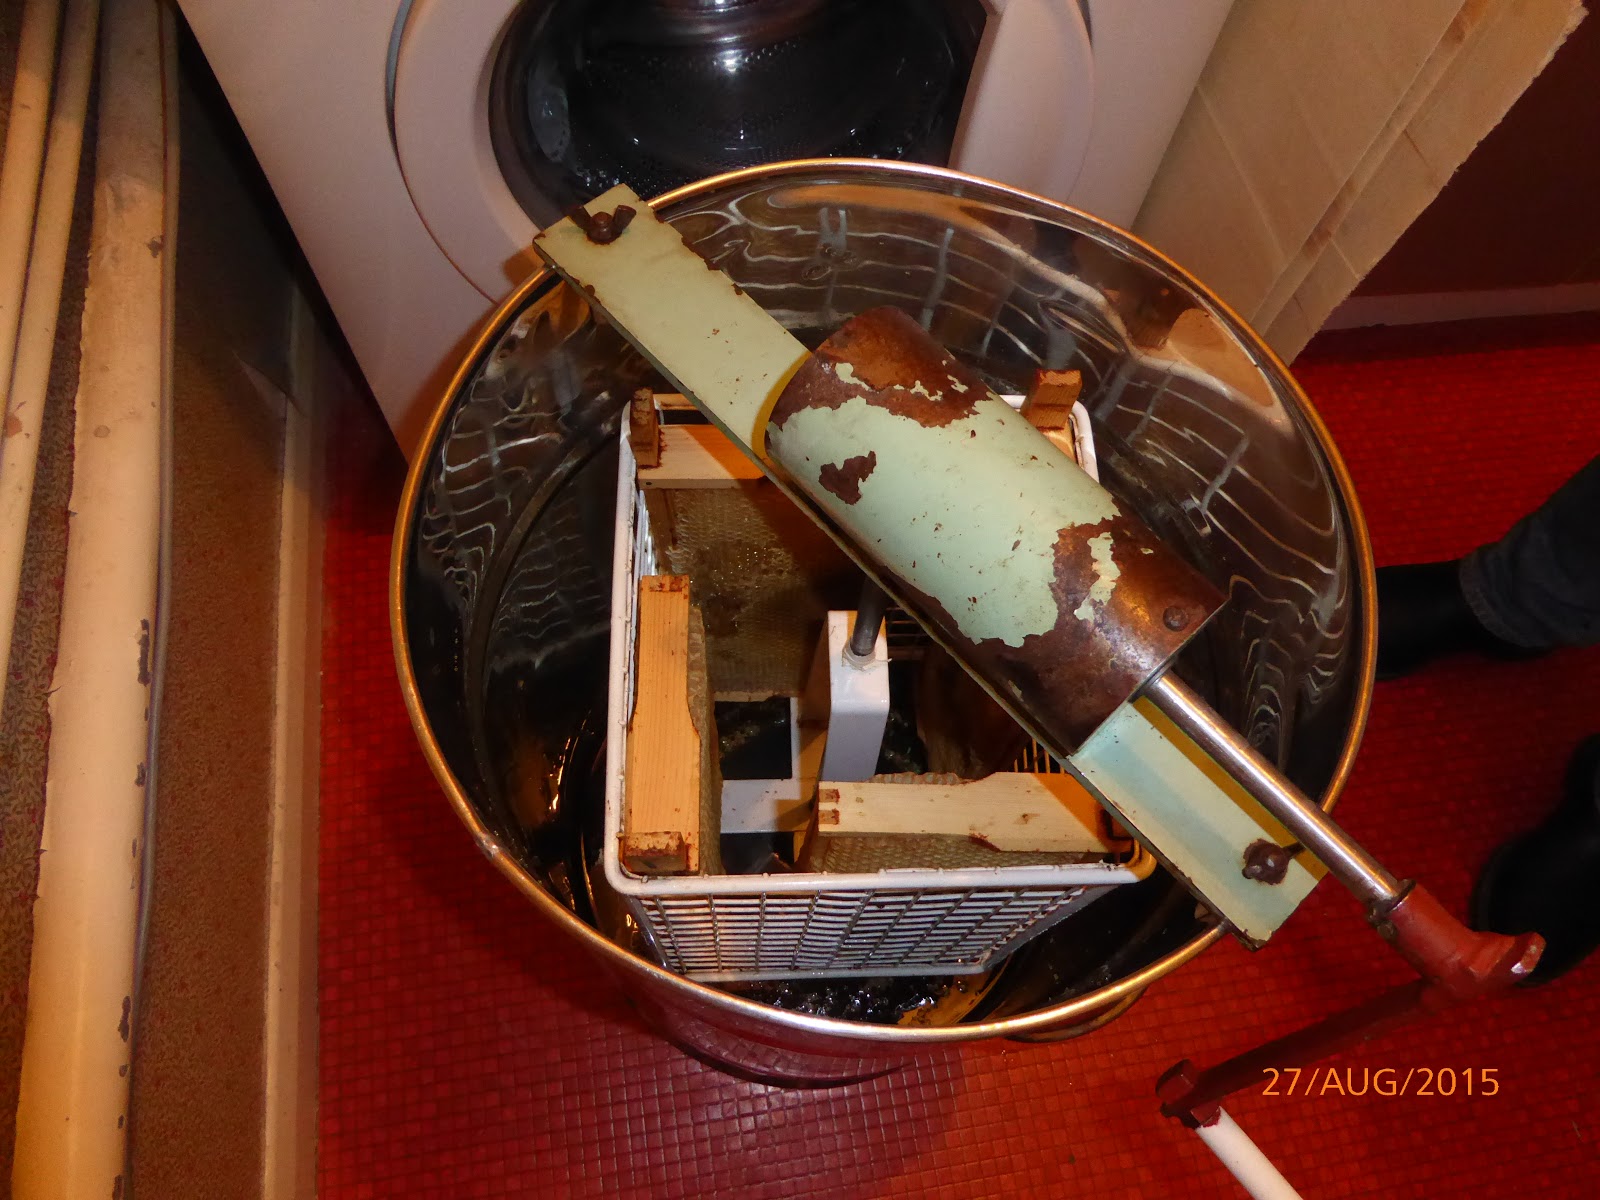
Firstly, we need to “uncap” the honeycomb. This involves running a sharp knife along the surface of the comb, to remove the thin wax caps that the bees use to cover each of the honey-filled hexagonal cells. The cappings fall to the bottom of the tray. There’s still some honey adhering to the wax, and we don’t want to waste it, so we keep the cappings in the tray now, and will come back to them later. After they’ve been uncapped, the frames of honey are placed into the extractor. This is a simple centrifuge inside a steel drum – when the handle is turned, the frames spin inside the cradle, and the centrifugal force sends the honey out of the comb and onto the side of the drum. The honey then trickles down to the bottom.
 Next is my favourite part – opening the tap on the extractor, and watching the honey flow out! It falls into a filtration bucket, which has a fine mesh on the top – this filters out any bits of wax (and the odd stray bit of wing or leg…) so that the end result will be pure honey.
Remember the wax cappings? After the honey has flowed through the filter, I put the cappings on top of the filter – this allows any remaining drops of honey to dribble off the cappings and into the bucket. Once I’ve got as much as I can, I take the cappings out and wash them. The wax can then be used to make candles or furniture polish.

 The last job – open the tap on the filtration bucket, and fill the jars. Then label them up, and we have a finished batch of delicious local “Beechen Bees” honey.

Firstly, we need to “uncap” the honeycomb. This involves running a sharp knife along the surface of the comb, to remove the thin wax caps that the bees use to cover each of the honey-filled hexagonal cells. The cappings fall to the bottom of the tray. There’s still some honey adhering to the wax, and we don’t want to waste it, so we keep the cappings in the tray now, and will come back to them later. After they’ve been uncapped, the frames of honey are placed into the extractor. This is a simple centrifuge inside a steel drum – when the handle is turned, the frames spin inside the cradle, and the centrifugal force sends the honey out of the comb and onto the side of the drum. The honey then trickles down to the bottom.

|

|
 |
 |
 Next is my favourite part – opening the tap on the extractor, and watching the honey flow out! It falls into a filtration bucket, which has a fine mesh on the top – this filters out any bits of wax (and the odd stray bit of wing or leg…) so that the end result will be pure honey.
 |
Nothing wasted
|

 The last job – open the tap on the filtration bucket, and fill the jars. Then label them up, and we have a finished batch of delicious local “Beechen Bees” honey.
Thursday 30 July 2015
Andy’s ‘Beechen Bees’
Here are a few photos that Stewart took while I conducted my routine inspection of my beehives last weekend. I keep two hives – you might have seen them, just off the alley that runs from the end of St Marks Road up to Calton Gardens. Here are the hives:
First things first – open up the hive! The beehive is basically a stack of boxes, each with several frames of honeycomb inside. For this particular inspection I was mainly interested in looking at what was going on in the box at the bottom, where the queen bee lives. So, off with the roof, stack the top boxes to the side, and lift out a frame to take a look:
This hive has a new queen, and she’s only been laying eggs for around three weeks. That’s important, because laying eggs is pretty much all a queen bee does – and she can lay 1,500 a day! For today’s inspection, I want to make sure she’s laying well, and therefore producing plenty of worker bees.
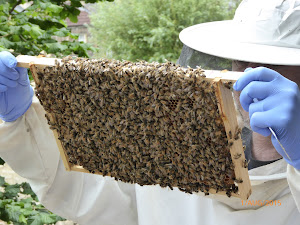
Let’s take a look at the frame of comb, and see if she’s been busy:
Yes, very busy! All of those cells with the biscuit-coloured wax cappings are grubs that are pupating into adult bees. There are lots of capped cells – which means lots of new bees – which means a happy beekeeper! If you look carefully, you can also see some of the grubs (beekeepers usually refer to them as “brood”) – they look like curled-up pearly-white maggots.
So, I have plenty of workers, but where’s the queen…?
This is a closer look at a different frame – this one has more empty cells. If the queen is on this comb, then she will methodically go through each empty cell, and lay an egg in the centre of each one. So, is she here? Yes! – if you look carefully you should be able to spot her – she is longer than the worker bees, and darker in colour.
But of course, the big draw of beekeeping is honey. I’m going to have a look at a frame in one of the other boxes, nearer the top of the hive to see how much has been collected:
Looking good – all the cells with the white wax caps have been fully processed, which is why the bees have sealed them shut. You can also see some dark, shiny cells – these contain nectar that is halfway to becoming honey, but the bees haven’t yet evaporated off enough water. Also, to the sides are some empty cells. I’m hoping the bees fill these over the next couple of weeks.
On to the other hive now. This one didn’t have a queen until recently – but the workers have made a new one, and I’m hoping she’s hatched out within the last couple of days. If she has, she will be quite shy, so this is a very quick inspection to check that she has hatched and all is well. As soon as I’ve seen her, I’ll put the hive back together and leave her alone.
 Good news – I spotted her on this frame. Unfortunately, I was too quick, and put the frame back in the hive before Stewart could get a close-up shot. Now that I know she’s safe, I’m going to leave the hive alone for three weeks, and then check back in the middle of August to make sure that she’s started laying plenty of eggs to grow into new worker bees.
 |
| Andy’s beehives |
 |
| Unstacking the hive |
 |
| The unstacked boxes |
 |
| Bees on the frames |
Let’s take a look at the frame of comb, and see if she’s been busy:
 |
| “Capped brood” |
So, I have plenty of workers, but where’s the queen…?
 |
| Can you spot the queen? |
This is a closer look at a different frame – this one has more empty cells. If the queen is on this comb, then she will methodically go through each empty cell, and lay an egg in the centre of each one. So, is she here? Yes! – if you look carefully you should be able to spot her – she is longer than the worker bees, and darker in colour.
But of course, the big draw of beekeeping is honey. I’m going to have a look at a frame in one of the other boxes, nearer the top of the hive to see how much has been collected:
 |
| Honey! |
On to the other hive now. This one didn’t have a queen until recently – but the workers have made a new one, and I’m hoping she’s hatched out within the last couple of days. If she has, she will be quite shy, so this is a very quick inspection to check that she has hatched and all is well. As soon as I’ve seen her, I’ll put the hive back together and leave her alone.
 Good news – I spotted her on this frame. Unfortunately, I was too quick, and put the frame back in the hive before Stewart could get a close-up shot. Now that I know she’s safe, I’m going to leave the hive alone for three weeks, and then check back in the middle of August to make sure that she’s started laying plenty of eggs to grow into new worker bees.
Subscribe to:
Posts (Atom)