Sunday 11 November 2018

Last Tasks of the Year

Now that harvest is over, there have just been a couple of tasks left before winter.  The first was to change the hive configuration and move the super of winter honey under the brood box.  Some beekeepers do this, others don't.  But it's the way I was taught, and I have never lost a colony in winter, so it's a technique that works for me.

I did the switch-over last month.  The brood boxes are heavy at this time of year, so it was a two-person job.  Fortunately, the bees' landlord, Nev, was on hand to assist!

Regular readers will remember the incident last year when I found a false widow spider living under one of the hand-holds on the brood box of hive #2.  I certainly remembered - and made sure to check under the hand-holds this time, before moving the brood boxes.  I'm glad I did, as a peek at the back of brood box #2 revealed this:

Uninvited guest!

Fortunately, this time I was prepared to face my nemesis.  And, naturally, as a committed enemy of spider-kind, there was only one course of action - a swift blow from the blunt end of my hive tool.  This particular spider did not live to see another day.

The last task was undertaken today, when I put the mouse-guards onto the hive.  These are perforated metal strips with holes large enough to let bees in and out, but small enough to prevent any mice from getting into the hive.  They look like this:

Mice not welcome.

Now that the final tasks of the season are complete, I can relax and leave the bees to their own devices until the warmer weather comes in the spring.

Tuesday 16 October 2018

Harvest Time

I'm a bit late with this post, as I actually harvested a couple of weekends ago.  The good news - I got some honey.  The bad news - not very much, only 13 jars in total.  That makes for just under 10 lbs of honey, which is pretty poor.  Nevertheless, at least I have two healthy colonies going into winter, and that's the most important thing.

Now for the weird news...  The honey has ivy nectar in it.  this means that it has a somewhat distinctive taste to it.  Ivy honey (and honey that is part-ivy, like mine) has a complex flavour that is less sweet than other honeys, with a distinct, earthy taste.  Descriptions include autumnal, like new leather, or woody.  I quite like the taste.  Mrs Beekeeper is not so keen.  So, it's not to everyone’s taste, but is one for the more discerning palate.

Here is the obligatory shot of the produce, before I delivered it to our exclusive retailer Widcombe Deli:


Wednesday 19 September 2018

Autumn Update

Apologies for not posting for a while - for various reasons, my bees have had to take a bit of a back seat while I've been getting on with a variety of other things through summer and early autumn.  Anyway, here's a bit of a progress update:

In my last post - back at the beginning of July - I found hive #2 empty, and burned the frames.  I left the hive empty for a while, and waited for the new queen in the blue nuc to emerge, mate and start laying.  She hatched out of her wax queen cell during the first week of July, and by the third week she was laying.  At the end of July I moved the colony from the nucleus into hive #2.  They slowly built up numbers (and comb) through August, though they hadn't collected anything in terms of honey.

Back in Hive #1, Laura's bees have filled two supers (of 10 frames each) and left another half-filled.  One of the full supers is theirs - they'll need the honey to get through winter.  The second, I will extract.  The last time I checked, the honey was still a little runny, so I'm leaving it for a bit longer while the bees evaporate off the water and get the honey to the correct constituency (18% water, 82% sugar).

I decided to move the half-filled super to hive #2, to get them started on their winter stores.  I've also been feeding them - at the beginning of September, I bought 24 x 1kg bags of sugar.  They've gone through 14kg already!  But at least the super is feeling a lot fuller.  Also, they are starting to deposit honey (or, to be strictly accurate, sugar syrup) into the brood frames, as you can see from this photo:


The other thing I've noticed is that hive #1 has a really large amount of bees, while hive #2 (having changed queens late in the season) has been struggling to build up numbers.  So I've been donating frames of capped larvae from Laura's hive to #2, to try to even the numbers up.  The number of bees in #2 has certainly increased over the last three weeks, so it seems to be working.

Coming up in the next post - the long-overdue naming of the queen in #2...!

Wednesday 4 July 2018

It's All Over for Hive #2

After seeing hive #2 looking to be in a sorry state at the last inspection, I decided that action was needed to sort things out once and for all.  So, last Tuesday I went to the Apiary after work and decided to remove all the brood comb that had ever been laid in (three frames in total).  I'm glad I did, too - once I had the hive open, I could see early signs of the Sacbrood infection returning.  It was time to kill the brood, to stop the bees being re-infected.

The process was easy enough - I moved the queen onto a new (combless) frame, shook the bees off the old frames and left the frames to one side.  I left in one-and-a-half frames of partially-drawn comb (for the queen to lay in), and the rest of the frames were new with nothing but fresh foundation.

Then I burned the frames.  They burn well:


On Saturday, I returned to do my weekly inspection.  But there was nothing to do in hive #2 - the bees had gone!  Here's proof:


This is known as absconding - for fairly obvious reasons.  Bees will do it if they are under stress, and decide that their current home is not conducive to their survival.  Factors can include:
  • Disease and parasites
  • Attacks from predators
  • Other significant disturbance (such as beekeepers!)
  • Starvation

Given that we know that the bees were sick (Sacbrood), had me interfering by removing the brood, and had no honey stores left (it was all on the frames that I burned) it's really no surprise that they decided that they'd had enough.  With the very warm weather that we've been having, they obviously thought that, if they find a nice undisturbed place to set up home, there's still enough time before winter for them to build some new comb and collect plenty of honey.  Of course, they may well have been collected by a local beekeeper, or they might have set up home somewhere up on Beechen Cliff.

Either way, I hope they found a comfortable new home and they're collecting lots of nectar and pollen in this lovely sunny weather!

Monday 25 June 2018

Midsummer Musings

It’s been sunny in Bath this week, which should be good news for bees.  However, that hasn’t stopped them indulging in a bit of silly behaviour...

It was very warm on Saturday morning, so I decided to do the weekly inspection after breakfast.  In the blue nuc, things were quiet.  Too quiet, in fact - surely there should be more bees?  And where was the queen?  After spotting a couple of queen cells - with larvae - it became clear what had happened - the bees had taken advantage of the nice weather, and swarmed.  Oh well, I shall have to wait for the new queen to emerge in a week or so.

Laura’s hive is doing well, with lots of bees and brood.  They have finally started bringing in honey, though I don’t think the crop will be anywhere near last year’s.

On to hive number 2.  The good news is the brood looks healthy, and there’s no sign of the Sacbrood infection that they suffered from last season.  However, there were a few spots of bee poo on the frames, and one poor bee with poo on her wings.  It looks like the colony might have a case of diarrhoea.  There are a few different diseases that can cause this.  I’m going to read up on them this week, so that next week I can make a proper diagnosis and take the appropriate course of action.

At least I spotted the queen, and I took the opportunity to mark her with a dot of red paint.  She is laying, though there is only so much she can do as the bees are barely drawing any wax.  I wonder if I need to feed them next week, to get them building?

One odd thing - despite the colony looking quite sorry for itself, they’d still gone to the effort of making a queen cell.  I took the side off so that I could get to the larva inside, and took a photo before I scooped it out:

A queen larva

The colony is taking a long time to build up worker numbers.  There is about a frame and a half of capped brood - hopefully when these workers emerge, the additional workforce might mean more foraging and more comb building.

Thursday 14 June 2018

Say Hello, Wave Goodbye - Part Two

In Part One we left the bees in the blue nuc leaderless, with the new queen having unexpectedly flown off into the undergrowth.  With the as-yet unnamed queen MIA, what was I to do?

The answer, quite simply, was nothing at all.  There was no chance of me finding her outside the hive, so I had to sit it out and hope that she came back.

I waited until just after six o'clock, and then headed back to look inside the nucleus.  I checked one frame, then another, and another...  and....

Imagine my relief on spotting the queen wandering nonchalantly around on frame number 4.  I wonder if she enjoyed her unexpected day out?!  This time I decided to mark her using the queen marking cage, just to make sure that nothing could go wrong.  Here's a picture of the newly marked queen:


Having finally finished the job that I'd made a mess of earlier in the day, I removed the queen cell that I'd found earlier, and put the roof back on the blue nuc.

Later, at dusk, it was time to wave goodbye to queen Dorothy.  Jessica came over to collect the other (brown) nucleus and take it to the other end of St Mark's road.  Jessica decided to hive the bees straight away, which is unusual as I have always hived bees in the middle of the day.  I think it's fair to say, from the number of stings Jessica received, that the bees were unimpressed.  It's always good to try new things in beekeeping, but I think this will be the first and last time that I try to hive bees after sunset!  Nevertheless, I hope Dorothy and her bees settle in to their new home.

Tuesday 12 June 2018

Say Hello, Wave Goodbye - Part One

Dorothy is leaving!  Though she won't be going far - fellow Widcombe beekeeper Jessica is going to look after Dorothy and her bees, at Jessica's apiary on Lyncombe Hill.  So yesterday, I'd arranged with Jessica for her to collect the brown nuc (Dorothy's colony) at dusk.  Bees will fly until sunset, so if you're ever moving a hive or nuc, it needs to be done at dusk, so that all the foragers have returned safety to the hive.

I popped over to the apiary at lunchtime, just to check that everything in the brown nuc was OK.  Yes - Dorothy was seen, and there are plenty of eggs and brood.

I then checked hive #1, just to make sure they weren't working on any secret queen-cell production programme.  Nope - everything in #1 was also as it should be.

Then, even though there was no need or reason to, I decided to take a look in the blue nuc.  This is the one with the unmarked queen who started laying a little over a week ago.  Everything looked OK, until I got to the middle frame, which had a six-day-old queen cell on it.  This was very odd - the queen has been laying for less than a fortnight, and the workers have no reason at all to making queen cells.  And yet, there it was:


I decided to leave it until I'd found the queen.  I spotted her on the next frame.  Since she was now laying, and there are sealed brood, I decided it's time to mark her.  I got hold of the marking pen (red, for 2018 queens) and got ready.  Normally I use a marking cage (click this link for photos), but last week I'd marked one of Ian's queens by holding her legs between my thumb and forefinger.  Having done it once, I decided to get some more practice and have another go.

Basically,  it's a four-step manoeuvre:
  • pick the queen up by her wings
  • transfer to other hand, and hold her by legs
  • dot the paint onto her thorax
  • put her back into the nuc (or hive)

The thing about picking up a queen bee is that they wriggle.  So you can't hold by the wings for too long, you need to transfer her to your other hand and hold her by the legs.  The important thing to note is her wing muscles are stronger than her leg muscles, so holding her by the legs is easier.  Well, I made the rookie mistake of holding her by the wings for too long, so of course she wriggled free and started wandering around on my right hand.

To rescue the situation, I tried to encourage her to walk onto my left hand, so that I could try to pick her up again.  She was having none of it - and promptly whirred her wings and took off!  I saw her disappear into the buttercups at the front of the hive and, despite frantic searching both inside and outside the hive, there was no sign of her.

In part 2, to be published later this week, I'll let you know how the story ends...

Wednesday 6 June 2018

​Four of a Kind

Sunday’s inspection went well.  Hive #1 is growing steadily, and the brown nucleus is also doing fine.  I left hive #2 alone, as the newly-emerged queen was probably out mating.

So, that just leaves the blue nucleus.  Last week, I tried and failed to find a queen, though there were signs that one had emerged recently.  On Sunday I had another look.  The first thing I spotted was eggs - this is good news!  It means I definitely have a queen in there somewhere, and she’s finished mating and started laying.

She gave me the run-around for a bit, but I found her on the fourth frame.  So I’m happy to say that I now have queens in all four of my hives.  And on Sunday, I had seen evidence that three of them were laying.  Which brings me on to...

Update - Today

My curiosity got the better of me, so I decided to pop along to the apiary at lunchtime today and see what was happening in hive #2.  After what they've been through, the colony is small - but at least they are looking nice and healthy.  And... there are eggs!  Plus, I spotted the queen.

So, I now have four laying queens, and all my colonies are back on track.

About Those Photos I Promised...

I don't have any bee photos to show you, but - last year, local botany enthusiast Stew planted some foxgloves at the apiary (thanks, Stew!).  And recently, Nev (the bees' landlord) and I have been doing planting near the hives (along with some other groundwork).  So here are a couple of photos to show you how things are looking so far:

Foxgloves - a favourite with the bumble bees.

Some bulbs and flowers growing by the new path.  So many buttercups!

Wednesday 30 May 2018

Introducing... Queen Dorothy!

Every beehive has a single queen bee, and the queen of the brown nucleus is called Dorothy.

She is named after Dorothy Mary Crowfoot Hodgkin, who was a Nobel Prize winning Chemist.  Dorothy was born in Egypt in 1910, and moved to England at the outbreak of World War I.  She was one of only two girls who were allowed to study chemistry at her grammar school in Beccles.

When she was 18 years old, Dorothy was admitted to study Chemistry at Oxford.  She graduated in 1932 with a first-class honours degree.  Dorothy then went on to study for her PhD, during which she began working on X-ray crystallography to study the structure of protein and sterol molecules.

After completing her PhD in 1937, Dorothy began to solve the structures of other biological molecules, including penicillin and vitamin B12 - for which she was awarded the Nobel Prize.

Dorothy was appointed the Royal Society's Wolfson Research Professor in 1960.  She continued her research into molecular structure, including working on insulin, which she had begun researching in 1934.  In 1969 she finally resolved the structure of the insulin molecule, opening the way to medical research and treatment for diabetes.  Dorothy continued to work with laboratories that were undertaking research into insulin, and gave lectures worldwide in the importance of insulin in the causes and treatment of diabetes.

Find out more:  http://enwp.org/Dorothy_Hodgkin

Tuesday 29 May 2018

Yesterday in the Apiary

After yesterday’s mammoth article, we’re almost back up-to-date on everything that’s happened in the apiary in May.  However, there was a bit of work to do yesterday in each of the hives and nucs.  This, in order of inspection, is what happened:

The Brown Nuc

The queen in the brown nuc started laying two weeks ago, and everything looked good yesterday - plenty of capped and uncapped brood.  I found the queen easily, and since there wasn’t anything else to do, and the bees were nice and calm, I got out my queen-cage and marking pen, and marked her with a dot of red paint (the colour for queens that emerged in 2018).

I have also officially named her - the name will be revealed in my next article!

The Blue Nuc

This was started two weeks ago, using frames and bees from hive #1 (but no queen).  The bees had clearly been busy making new queens, as I found two open queen cells from which queens had emerged.  Normally, when two queens emerge in a small colony, they will fight to the death - the winner gets to rule the hive.

I had a good look, but couldn’t see a queen anywhere.  This could mean that they killed each other in their duel.  Or, it might be that the survivor was out on a mating flight.  Or, I need to get my eyes tested!  I will have another look next week, and hopefully will spot a new queen.

Hive #1

This hive is doing well, and there is a lot of brood.  Hardly any nectar has been added to the super that I put on last week, but that’s probably because all of the nectar that’s being collected is being used to feed the new brood.

Since there was nothing else to do, I finally(!) got round to marking queen Laura.  Because she emerged in 2017, she was marked with a yellow dot of paint.  I had my queen-cage ready, but actually didn’t need it - when I had the marking-pen in my hand, Laura was in the middle of laying an egg, which left her perfectly still with her thorax exposed.  With a steady hand, I aimed the tip of the pen, and gently tapped the middle of her thorax - and was spot on target!

Hive #2

Because of the prior Sacbrood infection in hive #2, I routinely inspect this hive last.  The bees were a little moody, but otherwise fine.

I saw an emerged queen cell, and set about looking for the queen.  After going through the brood box twice, I was all ready to give up and put the last frame back into the hive.  Then, I heard a very reassuring sound - the unmistakable tone of a queen bee piping!  After another quick scan of both sides of the frame, I spotted the new queen marching determinedly across the bottom of the comb.  Excellent news - hive #2 is almost back up and running.  I’ll leave her alone for a couple of weeks to “entertain gentlemen callers”, and then check to see if she’s laying.

So that’s us all up-to-date.  Apologies for the lack of photos recently - now that I am back into the swing of things, I’ll try to get a couple of pictures into next week’s update.

Monday 28 May 2018

May - What's Been Happening With the Beechen Bees?

I've missed a few blog posts, so I thought I'd better give you all a quick catch-up on what's been happening at the Beechen Bees apiary.  Here's a run-down, by date, of what's been going on:

Saturday 5th May

Back on 18th April, I'd split the colony in the double-height nucleus, and the bees in the blue nucleus went (on the 19th April) to go and live in the ZEST hive on Sydney Buildings.  This had left 5 frames of bees, eggs and stores in the brown nucleus.  So the first task of the day was to see if the bees had produced a new queen.  Indeed they had!  So, once the new queen has mated, the brown nuc will be back up and running.

Hive #1 (Laura's hive) was all looking fine.  The only thing they are in need of is a comb change, which I delayed until the following week.

Hive #2 (Maria's hive) was not at all fine.  The queen was still only laying drones.  And I was worried that the comb might now be infected, because of the outbreak of Sacbrood that they suffered from at the end of last season.  I decided that they would need emergency measures, but that required finding queen Maria.  Which I didn't.  The hive would need to be sorted out the following week.

Monday 7th May

The early Bank Holiday was a glorious day in Bath.  I didn't need to open any hives, but there was still beekeeping to be done.  One of the tasks I'd been planning to do was refurbish the blue nucleus.  When I built it, I had used the wrong sized mesh for the floor, which had holes that were actually just large enough for a bee to crawl through.  This was not at all helpful!  I had bodged up an interim solution using a piece of plastic board which was inserted onto runners underneath the nuc, and then a second piece to cover the gap at the back.  This was OK - and served as a Varroa board as well - but it would regularly get clogged up with discarded wax cappings and other detritus.  A proper fix was needed.

I'd already bought the correct wire mesh around a year ago, and fetched it from the loft.  So, with a spare day and some spring sunshine, I got out my trusty Black & Decker Workmate bench and some tools, and got to work.  Much prising, nailing, screwing and sealing later, and the blue nuc was as good as new (more or less) and ready for some bees.

Sunday 13th May

The first task was to check the brown nuc, and see if the queen had started laying.  Yes - she had!  This is great news as the colony is now fully functional.  I just need to pick a name for the queen...

I checked hive #1 and everything was good - queen laying and all healthy.  Since I needed to do a comb change, I decided to do a 3-way move of frames between hive #1, hive #2 and the blue nucleus.  I proceeded as follows:

  • Leaving hive #1 open, I also opened #2 and went through the frames until I found queen Maria.  Then, I picked her up by her wings, took her to a flat surface (the top of the brown nuc, as it happens) and squashed her with the blunt end of my hive tool.  I can tell you, I don't enjoy killing queen bees.  Normally, it's the last thing you want to do as a beekeeper.  But Maria wasn't doing her job (of laying eggs) and there's no excuse for slacking off in a beehive.  So that was it - Maria was dead.
  • Next, I shook the bees off 8 of the frames in hive #2, leaving the bees on 3 frames.  These were pushed over to one end of the brood box.  The 8 frames that were now without bees were taken down to my burner.
  • I next went through hive #1 and found the frame with queen Laura.  Don't worry - Laura is fine!  I temporarily move the frame - and Laura - into a spare brood box that I'd placed on a stand between the two hives.
  • Then, I took two frames of stores (honey) and three frames of brood - with bees - and moved them into the blue nucleus.  This was then closed up, with the entrance block closed.
  • I then went through hive #1 shaking all the bees off each frame, and then moved the frame into hive #2 - at the opposite end from the three old (and possibly infected) frames.  After I moved each frame, I put a new frame with fresh wax foundation into hive #1.
  • At this point, hive #1 had bees and 5 new frames.  I added another 5 new frames, and then moved the (old) frame with Maria back into hive #1, into the middle of the frames.  Hive #1 now had 10 new frames and one old frame, and a laying queen.  I closed hive #1.
  • Hive #2 now had 5 old but healthy frames from hive #1, a gap, and then 3 old - possibly infected - frames.  I shook the bees off the three remaining (possibly infected) frames and took them to the burner.  I then put 5 fresh frames in, either side of the 5 old frames.
  • At this point, hive #2 contained 5 old but healthy frames from #1, 5 new frames, and no queen.  I closed hive #2.
  • I burned all 11 old frames from hive #2.
  • Last job, I opened the entrance block in the blue nucleus to let the foragers come and go.
A busy day's beekeeping, but hopefully my bees' health problems are now solved.


Sunday 20th May

Was world bee day!  And there was beekeeping to do:

Firstly, I went through hive #1, and found Laura.  She was on one of the new frames, which was handy for me as I wanted to take the last old frame out.  I took the old frame out of hive #1, shook the bees off it, and moved it into hive #2.  This frame had capped brood on it, which would help to bolster the number of bees in hive #2.

I put a new frame with clean wax foundation into hive #1 and closed up.  Since the colony were busy and collecting a lot of nectar, I also put a super (box of 10 honey frames) onto hive #1.

I then checked hive #2, and found a good-sized queen cell.  Excellent news - the bees have started to make a new queen.

I didn't check either of the nucleus colonies as there was no need - the brown nuc has a laying queen, and the blue nuc will hopefully be building queen cells.

Sunday 28th May

Today's inspection will have its own, separate post, which I'll publish tomorrow.

Monday 21 May 2018

Update on the ZEST Hive

Apologies for not having posted recently - most of my regular readers will understand the reasons why.

I have a couple of updates coming about my own hives, but first I have some pictures (kindly taken by Ian) of the first couple of sessions with the ZEST hive:

Hiving the Bees


Suited up and ready!

Moving the frames out of the nucleus...

... and into the ZEST hive.

Second Inspection


Taking the roof off.

Blocks to remove.

Ready to look at the frames.

Comb building has started!

This old frame is removed, and burned.

Next time, I'll have an update about what the Beechen Bees are up to.

Friday 20 April 2018

Start of the Season

This week, the weather suddenly changed.  Gone was the drizzle and April showers, and suddenly we're in glorious sunshine, with temperatures as high as 24°C.  Finally, on Wednesday, I got to open the hives!

There were basically three tasks for the day:

  • If the colony in the double-height nucleus is strong enough, split the colony.
     
  • In the hives, move the honey supers from underneath the brood boxes (my preferred winter configuration) to the top, with the queen excluder between (this is the summer configuration).
     
  • Check for queens, and the overall health and well-being of the colonies.

So, let's step through how the year's first inspection went:

The Nucleus

Part of the reason for splitting the double-height nucleus was so that I could move the blue nuc (which has a fixed floor, and is slightly more portable) over to Sydney Gardens, where the colony will move into the ZEST hive.  But first I had to check all was well.

The bees were busy - a good sign.  I found the queen (Elena) in the top half of the double-height nuc (the brown nucleus), so I swapped the frame she was on into the blue nuc, and moved another frame the other way.  This left the blue nuc with bees, stores (honey), brood (capped, uncapped and eggs) and a laying queen.  All good.

The brown nuc now has 5 frames of bees, stores, brood and eggs, but no queen.  This is no problem at all - the bees will start to make queen cells, and within 4 weeks I should have a laying queen in the brown nuc.  Task completed!

Hive #1

Fairly busy - of the 11 frames in the brood box, all had bees on them, and there were six frames of brood.  the queen (Laura) gave me the run-around, and I had to go through the brood box twice before I eventually found her.  The colony looked healthy and busy.  I put the brood box back at the bottom of the hive, then the queen excluder with the super on top, and closed the hive.  Task completed!

Hive #2

I was actually a little surprised that there are still bees in this hive, because of the outbreak of Sacbrood that I observed in the autumn.  But they are still hanging on in there, even though it's now quite a small colony.  Finding the queen (Maria) was easy.  But there is a problem - the brood.  There were only three frames of brood, and it all looked like this:

Bad brood

The dome-shaped cappings are characteristic - this is all drone brood.  And yet I have a queen who is less than a year old;  normally I wouldn't expect a queen to start failing until she's in her third season at least.  Has she become sick in some way, and her spermatheca is no longer working?  She is still laying eggs (I saw some), so why are they all unfertilised (male) drones?

Then, on another frame, I spotted a queen cell, with royal jelly in it, and a roughly 3-day old embryo.  And while putting this post together, I took a closer look at the photo above and saw this:

Emergency Queen Cell?

That looks to me like an emergency queen cell.  This suggests that one of two things is going on - either:
  1. The queen is still laying a tiny number of worker eggs, and when she does they are getting "promoted" to queens.  Or...
     
  2. The workers are creating queen cells, because they know the queen is failing, but they have no female eggs to work with.  So they are raising drones in queen cells.  I had a nucleus a few years ago where this happened - the workers will realise there is something wrong with the queen cells a couple of days after they're capped, and then destroy the (drone) larva and the cell.
So, I'm hoping it's [1], and the colony will soon get a new queen.  Otherwise, I will have to intervene (possibly by donating a queen cell from the nucleus, assuming that they make more than one).

The next inspection day looks like Saturday 28th April, so until then I will be crossing my fingers and hoping the bees sort things out for themselves.

Friday 13 April 2018

Organic Acids in Beekeeping - Part 2 - Formic Acid

Science warning: this post contains actual science. You have been warned...

Formic Acid molecule
(Wikimedia Commons, Public Domain)
In part 1, I covered the basic chemistry of organic acids.  Though you could say that my explanation was the opposite of basic...  (If there are any chemists reading - yes, that was a little in-joke just for you).

Last time we covered oxalic acid, which is used in the winter.  Beekeeping is usually done in the spring, summer and autumn, which means that we need a Varroa treatment that can be used during the warmer months.  Enter formic acid.

Like oxalic acid, formic acid is an organic acid.  But unlike oxalic acid, formic acid contains a carbon-hydrogen bond - which means that it meets the (not entirely accurate) definition of an organic molecule.

And, also like oxalic acid, formic acid exhibits the behaviour of a Brønsted acid.  Formic acid is a carboxylic acid, which means it can donate one proton (positively-charged hydrogen nucleus).  This then makes the formic acid molecule negatively charged, a state known as the conjugate base.  When in this negatively charged state, formic acid is called formate.

If you're still awake, let's move on to where formic acid is found in nature.  One place where you will definitely have encountered it is as a component of the stinging hairs on stinging nettles.  It is also a component of the venom of ant stings.  In evolutionary terms, ants are fairly close cousins of honey bees.  And yet, bee stings don't contain formic acid.  Weird.

So, our interest in formic acid in beekeeping is not in the bees themselves.  Rather, it is because formic acid is useful as a weapon against the Varroa mite.  Formic acid is an acaricide, which is a chemical agent that kills ticks and mites.  The specific mode of action is that it acts on the mitochondria in the cells of the Varroa mite.  Mitochondria are found in the cells of all animals, and they generate energy through aerobic respiration.  There are different processes for doing this (I will spare you the details), but they result in the production of adenosine triphosphate (ATP), which is the molecule that is used for energy transfer throughout the body.

The processes all rely on a very clever bit of biochemistry called an electron transport chain.  This is a sequence of enzymes that receive, and then pass along electrons (negatively charged particles) along the chain.  The end of the chain is negatively charged (because of the electrons), which creates an electrical gradient across a membrane in the mitochondrion.  This causes protons (those positively-charged hydrogen nuclei again) to flow across the membrane from the neutrally charged side to the negatively charged side.  And this proton flow provides the energy for an enzyme called ATP synthase to create ATP.

At the end of the electron transport chain, but before we get to ATP, is an enzyme called cytochrome c oxidase.  As with each of the enzymes in the chain, the job of cytochrome c oxidase is to receive electrons from further up the chain and pass them along.  But formic acid inhibits the action of cytochrome c oxidase.  This interrupts the electron transport chain, which prevents the proton flow and stops the production of ATP.  Without ATP, the Varroa mite has no means of transferring energy round its body, so it dies.

So, does formic acid affect ATP production in honey bees?  Well, actually - yes.  But the effect isn't as severe.  Some bees die in the first few days of treatment, and there is a risk (though less than a 5% chance) of losing the queen.  But these are acceptable losses and risks, when compared the the more significant problems - including colony loss - that can be caused when the number of Varroa mites in the hive gets too high.

I usually apply a formic acid treatment once a year, normally a week after I've harvested the honey.  It comes in the form of a gel which takes about a week to evaporate.  I don't particularly like doing it, but needs must.  And the bees don't like it either, but I suppose taking your medicine is no fun, is it?

Wednesday 21 March 2018

It's Spring!

Yesterday was the vernal equinox, which means that from today the days are longer than the nights.  So it's spring, and that means beekeeping!

Actually, there was only one job today - but an important one - remove the mouse guards from the hives.  The bees are starting to bring in pollen from the early flowering trees (blackthorn and cherry), and I don't want them to accidentally knock it off their legs as they pass through the small-ish holes in the mouse guards.  So, the mouse guards have been duly removed.  Here's a quick before-and-after:

Before...
... and after!

I also had a chance to pop over to Sydney Buildings to take a look at the new ZEST hive.  Here's a picture of it with the roof off, and all the new frames:


... And with the roof on:


We just need to get some bees in there, now!  I have a plan for that...

Thursday 15 March 2018

What's a ZEST Hive?

If you read my recent(ish) review of the year, you may have spotted that I've been chatting to some neighbours in Sydney Buildings who want to get started with beekeeping in the spring.  We've met up a couple of times to discuss various things for when they get started.  One of the options is which hive design to go for.

Regular readers will be aware that when I started beekeeping, I used the British National hive design.  And that, a couple of years ago, I converted my hives to the WBC design.  Well, there are actually plenty of other hive designs around, including:
  • The Commercial hive
  • Langstroth hive
  • Smith hive
  • Dadant hive
  • Dartington long hive
  • Warre hive
  • Top Bar hive
These are all wooden hives, but vary in the shape of the boxes, the way the honey frames are added (either sideways, or "upwards") and whether comb is built in frames or hangs from horizontal bars.  But the Sydney Buildings group have decided to go for a different design entirely - they've picked the ZEST hive.  But what is it?

Well, ZEST is a (sort-of) acronym for Zero Energy Sus-Tainable.  Which doesn't tell you very much, although the creators of the hive have written about how they believe their design requires less intervention than traditional beekeeping, and has benefits for the bees in terms of their management of hive conditions (such as temperature and humidity) and Varroa control.

But the really interesting thing about this hive is it contains hardly any wooden parts.  Instead, the hive body is made from lightweight building blocks, and the frames are made of plastic.  Also, the hive doesn't have any supers - instead, it works like a top-bar hive in that new frames are added at the ends, so the colony gets "longer" rather than "taller" as it expands.

Steve, from the Sydney Buildings group, has already built the first hive, which I must say took far less time than I took to build my first (National) hive.  He kindly sent me some pictures of the build:

Building the base

Starting the walls

Walls complete

The roof blocks go on

Yes - that really is a beehive!  Admittedly, it hasn't got the aesthetics of a Georgian (skep) or Victorian (WBC) hive - so apologies to the Bath Preservation Trust...!  But if you're a fan of modernism/brutalism, then this could be right up your street.

I'm going to be working with the Sydney Buildings group throughout their first season, so there will be more updates to come.  In the meantime, there's some more information on the ZEST hive at www.thezesthive.com .

Monday 26 February 2018

Organic Acids in Beekeeping - Part 1 - Oxalic Acid

Science warning: this post contains actual science. You have been warned...

Oxalic Acid molecule
(Wikimedia Commons, Public Domain)
I mentioned in a previous post that I would go into some more detail about Varroa treatments.  The first one - and the one usually applied in winter, is oxalic acid.  But what is it?

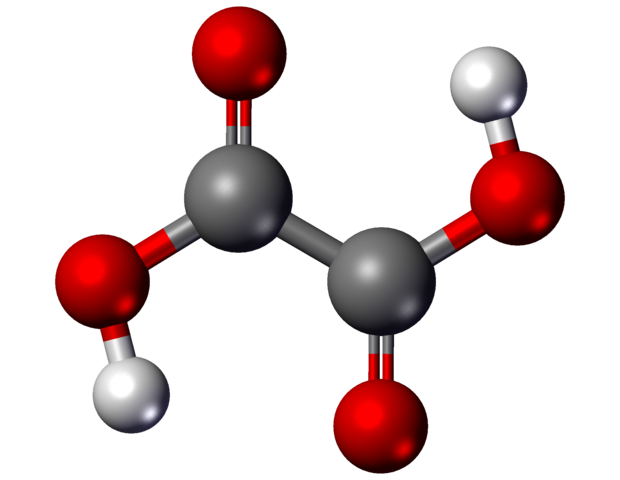
Before we get to that, a quick reminder of how atoms work.  They consist of a nucleus, which contains one or more protons - each of which has a positive electric charge.  The nucleus usually contains neutrons too - but we don't need to worry about that right now.  The other component of the atom is electrons - each atom has one or more of these, and they are negatively charged.  The nucleus is at the centre of the atom, with the electrons round the outside, which is why schools often teach that atoms are like mini-solar-systems.  (Proper physicists can explain - at length - why that isn't actually true.  But we don't need to worry about that today, either.)  Now, molecules are basically two or more atoms stuck together in a particular way.  All clear so far?  Good - onto oxalic acid:

Firstly, it's an organic acid.  Let's look at what that means.  Organic has a (somewhat) specific meaning in chemistry - it means that each molecule of the chemical contains the elements carbon and hydrogen, and that it (usually) contains a carbon-hydrogen bond.  This, in turn, means that the molecule contains a join between at least one carbon atom and at least one hydrogen atom, and this is a covalent bond - which means that the bond is formed by the hydrogen atom sharing its electron with the carbon atom.

However, this definition is a little arbitrary, because there are certain organic chemicals that contain carbon but lack a carbon-hydrogen bond.  And, wouldn't you know it, oxalic acid just happens to be one of these exceptions.  So, oxalic acid is organic because basically chemists say it is.

Secondly, oxalic acid is an acid.  An acid (strictly speaking, a Brønsted acid) is a chemical which has a molecule that is structured such that it can donate one or more protons to another molecule.  A proton is a hydrogen nucleus - in other words, a hydrogen atom but without its electron.  And oxalic acid belongs to a group called the dicarboxylic acids, which (to simplify somewhat) means that it can donate two protons.  This then gives the molecule two negative electric charges (because it has donated the protons - the hydrogen nuclei - but kept the two electrons from the hydrogen).  It is the donation of the two protons, and the resulting double-negative charge, that makes the oxalic acid chemically reactive, and makes it an acidic reaction.

Oxalic acid was originally isolated from wood-sorrel (Latin genus name Oxalis).  Fun fact - it occurs in relatively high concentrations in rhubarb leaves, which has given rise to the idea that women used to slowly murder their husbands by feeding rhubarb leaves to them.

So, why oxalic acid?  Well, it's no coincidence that it occurs naturally in wood-sorrel, rhubarb, and lots of other plants.  They have evolved the production of oxalic acid, particularly in their leaves, to discourage invertebrates and larger animals from eating them.  So, from this we know that it's toxic to invertebrates - which includes insects and arachnids.

The Varroa mite is an arachnid - which means that it is susceptible to oxalic acid poisoning.  The actual mode of action is interesting.  The acid is applied by first dissolving in a 1:1 (by weight) sugar syrup, to create a solution that is 4.2% oxalic acid.  This is then trickled into the hive, so that it falls onto the bees between the frames of wax comb.  It appears the bees don't tend to consume much of the liquid (though there are different studies with different data about this).  What does happen is, as the bees move around the hive, the oxalic acid solution gets spread around on their bodies, and gets smeared into smaller and smaller droplets.

Once the droplets are small enough, the water evaporates off leaving sugar and oxalic acid crystals.  The sugar isn't important, but the oxalic crystals are.  They are now on the bees' bodies, which is also where the Varroa mites are.  As they walk around on the bees, the mites pick up oxalic crystals on their feet.  The crystals then dissolve on the feet of the mites.  What happens next depends on which study you read.

One version says that the oxalic acid damages the mites' feet (strictly speaking, the cuticles at the end of the legs), causing them to lose their grip on the host bee and fall off.  This happens because the mites' feet are made of chitin, which is a long-chain polymer similar to cellulose.  The polymer chains are held together by hydrogen bonds (sorry, more chemistry), which are held together by electrostatic forces.  Remember that oxalic acid works by donating positively-charged protons and thereby becoming negatively charged.  All this positive-negative charge jiggery-pokery interferes with the hydrogen bonds, which causes the chitin polymer chains to separate from each other, irreparably damaging the feet of the mite.

The other version is that the oxalic acid is absorbed through the mites' feet and travels through the haemolymph (the internal liquid they have instead of blood).  The exact effect of the toxicity is not clear - although damage to the mites' mouthparts has been reported.  Since these are also made of chitin (as are pretty much all hard parts of the mite) it may well be the acid's interference in the hydrogen bonds that causes Varroa mite mortality.

While a 4.2% solution of oxalic acid is at too low a concentration to cause much harm to adult honey bees, there is some evidence that it can damage brood.  Also, oxalic acid treatment only affects mites that are on the adult bees (known as the phoretic stage) - not the mites that are in the brood cells with the larvae.  For both these reasons, it is therefore best to undertake oxalic acid treatment when the hive has little or no brood.  The colder the weather, and the shorter the daylight hours, the less brood there will be in the colony.  Which is why most beekeepers tend to treat between the winter solstice and the end of the year.  And why I was out on a cold December day over the Christmas holidays, dribbling oxalic acid solution into my hives.

There is another organic acid that is also used as an anti-Varroa treatment, which we'll look at next time.

Saturday 20 January 2018

Looking Back, and Forward

I know my regular readers are a clever lot, so I'm sure you all know that January is believed to be named after the Roman god Janus.  (And, if you're really clever, you know that this might not actually be true... but I digress.)

Anyway, Janus is depicted with two faces, one looking back to the past and the other looking forward to the future.  So, it being January at the moment, let's take a look back over the past year of beekeeping, and then see what might be happening in the year ahead.

2017 - What Went Well?


Honey!

It was a bumper crop this year - my best yet, yielding a total of 80 jars of honey.  But why?  I think it was down to two things.  Firstly, the bees had over-wintered better, which I think is at least in part due to my conversion of the hives from the British National design, to WBC.  This creates a second, outer hive wall, with a cavity between the inner and outer walls.  The effect of this seems to be better temperature control inside the hive - and possibly also a reduction in dampness.  Anyway, I certainly had more bees at the beginning of the season than I've had in previous years.

Secondly, the weather (until mid July) was just perfect for flowering plants and blossoming trees - warm, sunny but with enough rain showers to keep the plants sufficiently watered.  Sadly, I can't control the weather, so I can't claim credit for this - it was just a lucky year.

Bottoms up!

Propolis Gin

This was a fun surprise from Sue, our local apothecary.  I'd basically taken the propolis in and said "can you do anything with this?"  Well, after six months steeping in gin, Sue had done something quite wonderful with it, and created a rare and fine beverage!

More Bees

As well as growing the number of bees in the hives, I ended up doing three colony splits this year (two for swarm control, and one a "retirement plan" for queen Miriam).  This meant that I was able to sell two nuclei - one to Bath's Mayor Ian, who started beekeeping this year, and the other to local beekeeper Jack.  The third nucleus was kept in my apiary as a spare, so that if I lose either of the hive colonies over winter, I can replace it with the colony in the nucleus.

However, having a lot a bees has its drawbacks...

2017 - What Went Badly?


Too many bees?

I like to try one new beekeeping technique every year, and this year it was the "brood-and-a-half" hive configuration.  This allows the queen to lay in one of the super, as well as the brood box, enabling her to make far more bees.  Did this work?  Yes, very well - too well, in fact.  By the middle of June, the colony in hive #2 had become so large they were almost unmanageable, and I had to go back to the single-brood configuration just to calm things down a bit.  Which brings me onto...

Temper

This is the first year when I have undertaken a couple of beekeeping sessions that I didn't really enjoy.  That's because this year, for the first time, my bees became bad-tempered - which meant chasing me round the apiary and stinging me a lot more than usual.  On one occasion this can probably be explained by an approaching storm, which discombobulated them.  And then there was the incident with the spider.  But I also suspect that genetics have had a role to play.  All my bees are descended from my original queen, Rosalind.  My queens have mated with a variety of drones over the years, and no doubt some of their suitors have been more suitable than others.  But at some point, a genetic disposition for bad temper has found its way into the bloodlines.  The normal way to deal with this is to remove the queens, and replace them with new queens from a breeder that raises very gentle bees.  However, I like the fact that all my bees originate from my first queen, and so (somewhat sentimentally) I don't fancy replacing any of my girls.  Of course, the fact that I name all of the queens probably doesn't help...

Burn it with fire...
Sickness

I have taken a bit of a laissez-faire approach to managing combs this year - for example, I didn't undertake a full shook-swarm on either of my hives.  I should have known better - and my sloppiness caught up with me.  Firstly, the colony in the Blue Nucleus got a case of what I suspect was Chronic Bee Paralysis Virus (CBPV).  That forced me to do a shook-swarm on the colony, and burn the old brood frames.  A week later, and they were looking a picture of good health.  Lesson learned...

... or was it?  I still didn't change the combs in the hives (why?!) - and three months later hive #2 got sick.  This was a different illness - Sacbrood - and potentially more serious.  However, I discovered it in the second half of September, and this is way too late in the year to undertake a comb change.  So, I just had to leave them and hope that they survive the winter.  Fingers crossed that they make it to spring, when they will definitely be getting completely fresh comb!

2018 - What's Coming Up?


I have three targets that I want to achieve this coming season:
  • Change the comb for all the colonies - i.e. both hives and the nucleus.  Hopefully this will keep the bees nice and healthy this year.
     
  • Mark the queens!  I never got round to it last year, between all the other shenanigans and the wet weather in the latter half of the season.  Ideally, I will do this the week after the comb change.
     
  • Deal with my bad-tempered queens.  Since I'm basically relying on them randomly choosing to mate with drones from good-tempered families, I haven't given myself much in the way of options here, other than crossing my fingers and hoping for a good result.  Unless I manage to come up with a cunning plan...?

Also, I'll be working with Ian again as he settles into his second season of beekeeping - and discovers the joys of trying to stop his bees swarming.  And I had a meeting this morning with some neighbours in Sydney Buildings who are interested in setting up a community beekeeping scheme.  One of the interesting options we looked at was a different hive configuration - the Top Bar Hive - which is a horizontal design that doesn't have any supers.  For those of you who watch Gardeners' World, this is the design that Monty Don has in his garden at Longmeadow.  It will be interesting to try out a hive design that I haven't experienced before, and see what happens.

So, another three months to wait until the warmer weather and the longer days, and then the 2018 beekeeping year will get under way.