Saturday 31 December 2016

Review of the Year 2016

Firstly, I hope you all had a super Christmas.  I have received some new hive parts as presents (thank you Mrs H and Mrs C!) which I shall have fun putting together before spring, ready for next season's activity.

So, it's that time of year when we all look back before we look forward, and I thought I'd join in the fun.  How have the bees been this year?

Short answer - well!  Slightly longer answer - Miriam's bees in hive #1 have done very well (39 lbs of honey is a personal record) and hive #2 is in great shape under Caroline, having had a difficult start to the year under previous queen Florence (RIP).

So, what's gone well, and why?  And more importantly, what have I learned?

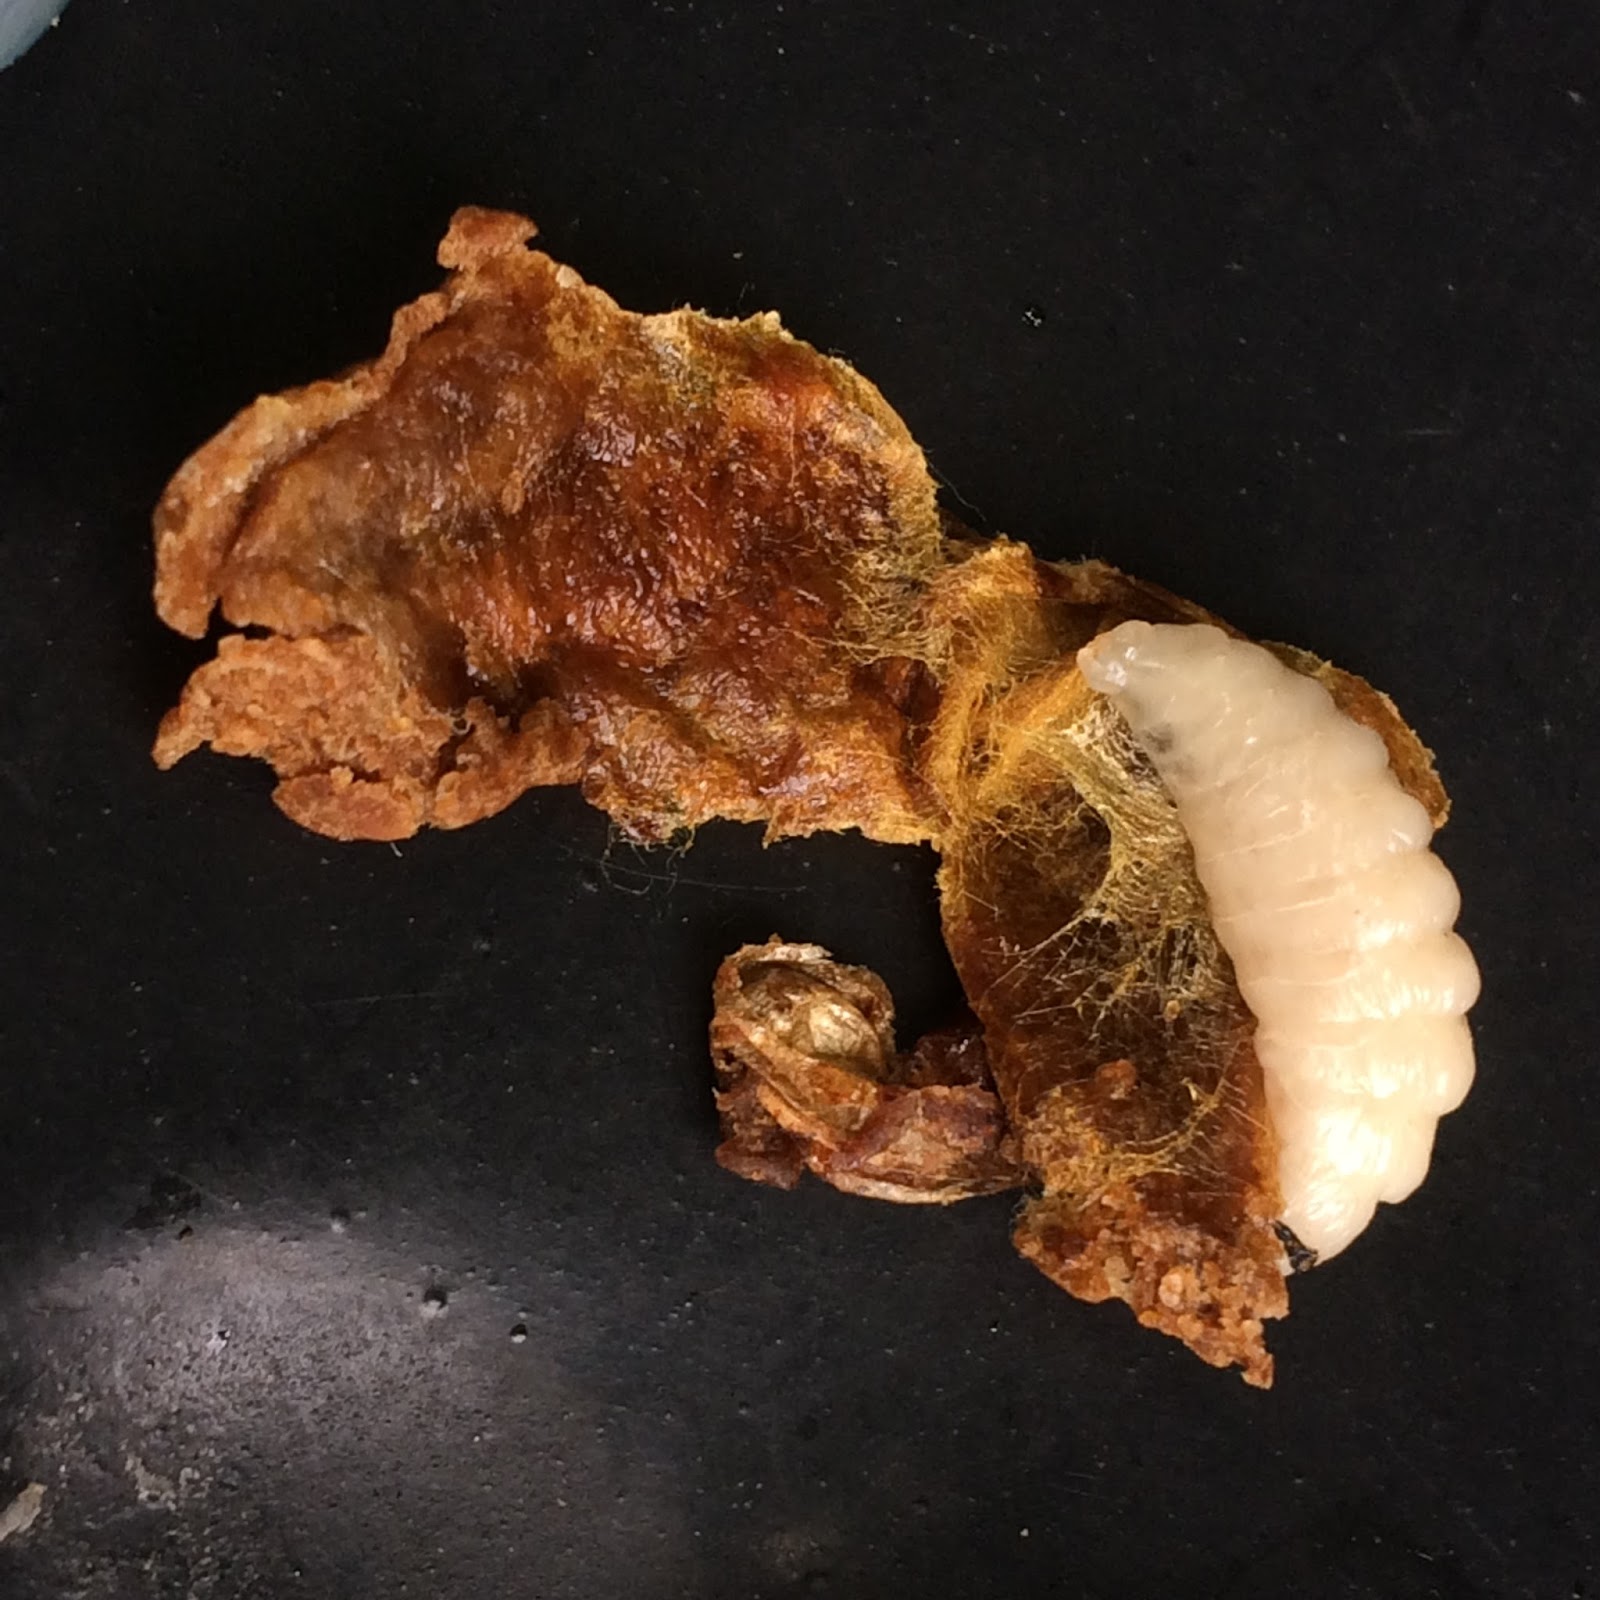
Firstly, bees notice when you do stuff.  Actually, I knew this already - the whole hive is a delicate balance of hormone feedback pathways, and if you upset the balance, it fundamentally changes the bees' behaviour.  So it was with Florence's hive - back in May, I decided to start swapping out brood frames (with larvae and pupae) from Florence's hive to Miriam's.  This was great news for Miriam's hive, which built up numbers very quickly.  But for Florence, it meant not enough brood - and the bees knew it.  What they didn't know (how could they?) is that it was my fault.  So they mis-identified the culprit as Florence, and mis-diagnosed the problem as her failing to lay enough eggs.  Bees have a pretty unforgiving attitude to under-performing queens - so they executed her.  Ouch.

Fortunately, they also have the means to create a new queen when required, so a bit of jiggery-pokery later, and they were back up and running with new Queen Caroline.

Queen Caroline!

Next up - comb changes.  I like to change the brood comb every year, as this prevents viruses, fungi and other pathogens building up in the wax.  I was always taught to do it in April, as soon as possible after the first inspection.  The problem was that, this year, I simply couldn't, for two reasons:  Firstly, the weather was really cold until May, so I really couldn't open the hives up during most of April.  And when I did, both colonies were too small - there simply weren't enough worker bees to make any significant amount of wax comb.  So I had to wait.

The moment of realisation came just after I'd taken the honey off Miriam's hive in the middle of August.  The colony size was at its peak (around 60,000 bees) yet I'd just halved the size of the hive.  There were too many bees, and nothing for them to do.  The answer?  Give them 11 new frames, and get them to work building wax!  The results were fantastic - I've never known them to build comb so quickly.  So the big learning point was this:  Don't get the bees to build comb in the spring when they've got a load of other tasks to do - get them to do it straight after harvest when their season's work is done and they have loads of spare workers.  This is going to be part of their annual schedule from now on.

A lot of bees...

The next thing that went well - I actually sold some honey!  For the first year ever, Beechen Bees honey has been available to buy on the high street.  Specifically, in The Deli, Widcombe - about 200 yards from the hives.  Big thanks to Nicky and everyone else for such a great job of marketing and selling my honey - really looking forward to doing it again next year!

Gift Pack - Beechen Bees Honey and Honey's Midford Cider - delicious!

Winter preparation:  I think my bees were in the best shape ever, going into Winter.  Miriam's colony already had all the honey they needed, so there was no need to feed them at all.  Caroline's needed some feeding, as they had lost a lot of time with the change of queen, and the consequent impact on colony size.  Luckily, Autumn was warm with plenty of good forage (ivy and bramble in particular) so they built up numbers well through September.  By the time I set the hives in their winter configuration, they both had plenty of bees and honey and were all set to hunker down for the colder weather.

Winter prep - icing sugar encourages grooming, to remove parasites

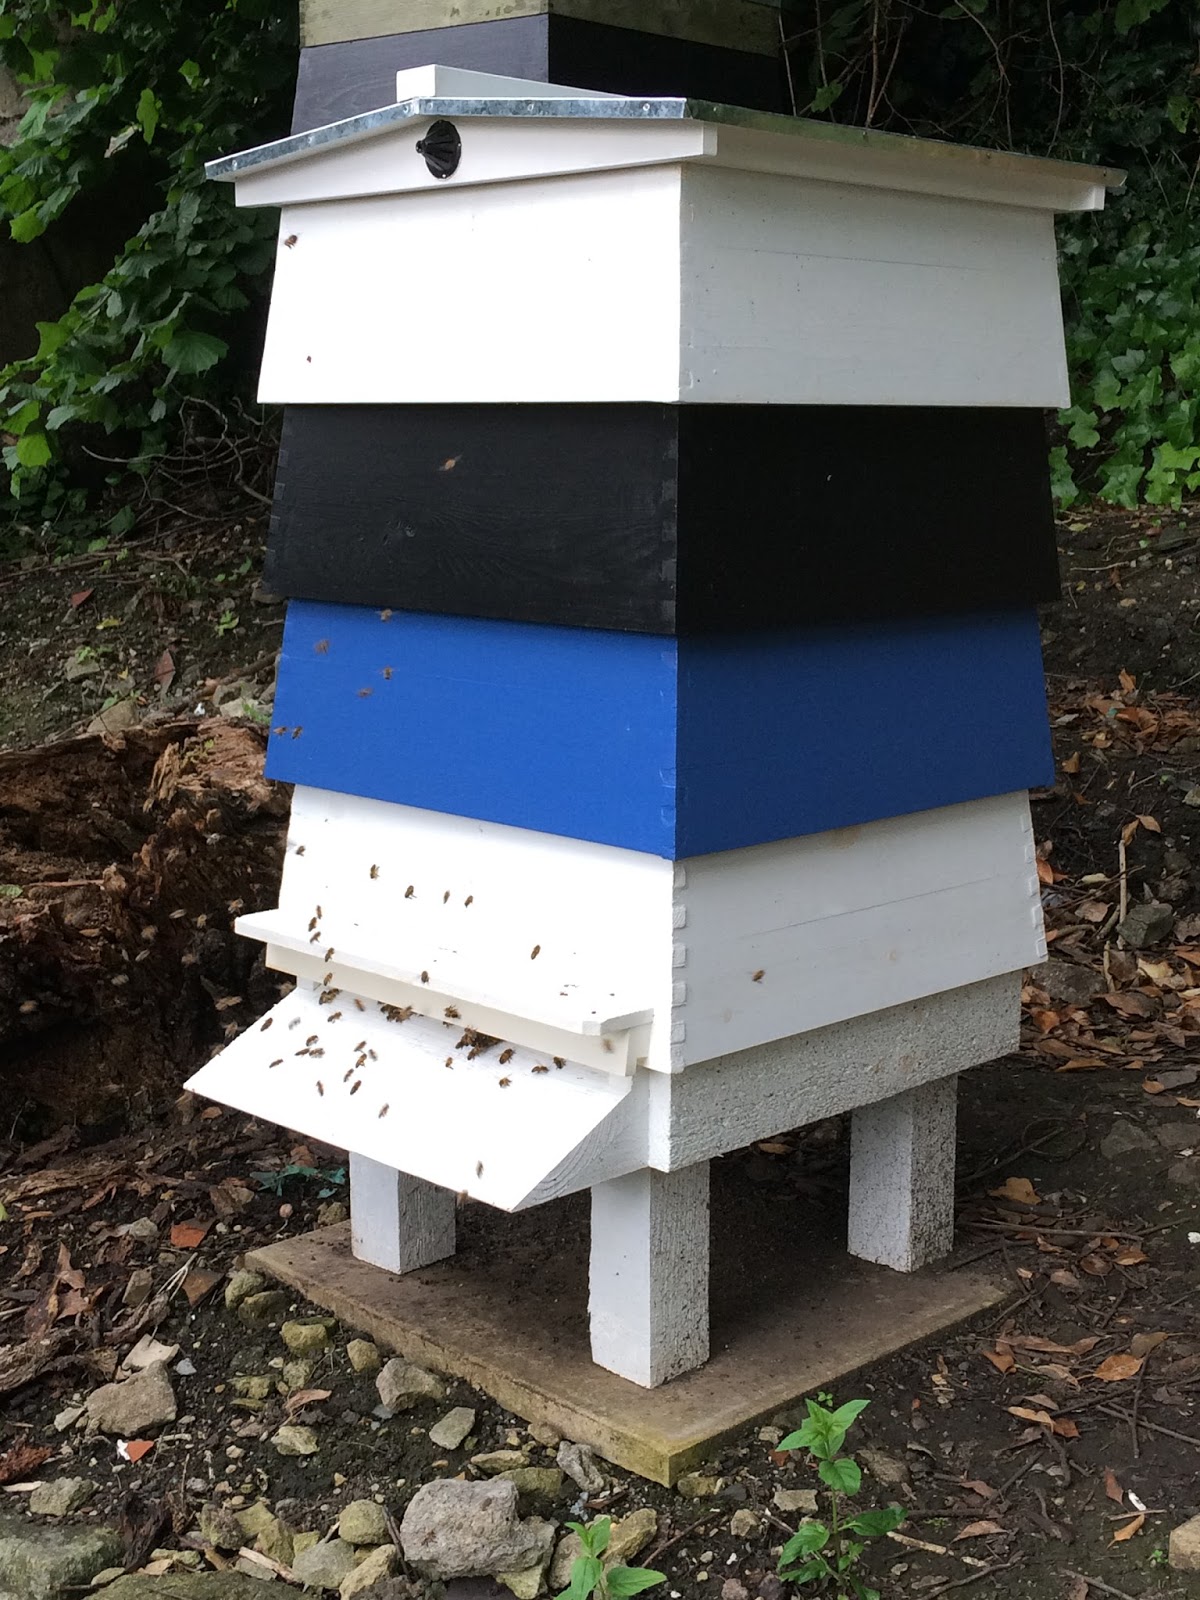
The last big change was the conversion to a different hive design - the WBC.  This double-walled hive should help with temperature regulation in the hives, and also assist in keeping them dry inside, which matters down here in Somerset where the climate is often damper than in London, where I started beekeeping.

Double-walled WBC hives all ready for winter

... and I should of course mention the blue, black and white paint job on the new hive outer walls, which has brought a resurgence in form to the mighty Bath rugby team!  It must be working, 'cos we're currently 3rd in the Premiership...

So here's looking forward to 2017, with hopefully more bees, more honey, and more wins for our boys in Bath!

Tuesday 18 October 2016

Mouse-Proofing

Pretty much the very last task of the beekeeping year is mouse-proofing the hives.  Surprisingly, mice quite like to nest in beehives during winter, because it's nice and warm, and there is plenty of food (i.e. honey and wax) for them to eat.  Personally, I'd rather not snuggle down with 10,000 stingy insects, but mice are apparently prepared to take the risk.  Actually, once the weather gets cold the bees won't be moving round very much, so if the mouse finds a cosy corner it will probably get through the winter undisturbed.

There are certainly mice around - our cat, Patsy brings us the proof, from time to time!  And if a mouse got into one of my hives, it would almost certainly be the end of the colony, as it would eat too much of the bees' precious stores of honey.

So, I need to put a device called a "mouse-guard" (beekeepers are very utilitarian in their terms) onto the front of the hive.  It's basically a perforated metal strip, with each of the holes large enough to allow a bee through.  The ones I'm putting on the hive today look like this:


The design of the WBC Hive is very convenient, because it allows for the mouse guards to be inserted into the porch, and held in place by the sliding blocks that are normally used to control the size of the entrance.  It's easier to show it in a couple of photos:


So, with the mouse-guards in place, the bees are well-protected as they start to bed down for the winter.  The mice will just have to find somewhere else to make their nests!

Thursday 13 October 2016

Asian Hornet - Update

The good news - the Asian Hornet found near Tetbury has been tracked back to its nest, and the nest has been destroyed.  The bad news - another confirmed sighting north of the Mendip Hills at the beginning of October (and the nest not found, yet).  This puts Bath pretty much between the two confirmed sightings.

So, it's time to take some action.  I'm going to make a trap.  DEFRA and the National Bee Unit have helpfully provided instructions for constructing a home-made Asian Hornet trap out of two 2-litre fizzy drinks bottles, steel mesh and some wire.  I have my kit ready:


So, all I have to do is finish drinking the lemonade, and get busy!

Hopefully, there aren't any more Asian Hornets and my trap will stay empty.  But if I do get one, then it will need to go off to DEFRA for confirmation and analysis.  Fingers crossed it won't come to that...

Sunday 25 September 2016

And So To Bed...

It's the last weekend in September, and that means the last beekeeping day of the year.  There were only three things to do, in this order:
  1. Check that both hives have enough honey stored for winter.  Yes, they do - so I can stop feeding Caroline's bees now.
     
  2. Change the hive configuration.  Normally, the super (the box with the honey frames, but no brood) goes above the queen excluder, which is above the brood box (where the queen lays all the eggs).  In winter, I put the super underneath the brood box, and remove the queen excluder - allowing the queen, and the rest of the colony to roam freely.  The idea behind this is that the bees will generally form the cluster at the bottom of the hive (in the super) and then work their way upwards - to the brood box - as winter progresses.  This means they will be in the brood box when spring comes around, which keeps things nice and tidy for me.  Actually, not all beekeepers do this, but it's how I was taught, and it's served me and the bees well so far.

    There are a lot of bees in each hive at the moment, and there's a lot of honey on the frames - making the boxes pretty heavy.  So, this was going to be a two person job.  Luckily, my friend Fi was visiting this weekend and was on hand to help.  Unluckily, she got stung (twice) while helping me move the boxes around.  Well, that's bees for you...  (Sorry, Fi!)
     
  3. Finally, sprinkle some icing sugar onto the brood frames.  Here's Fi doing just that:


    The reason for doing this is it gets on the bees, which then groom each other to remove the icing sugar.  As they do so, they are more likely to find varroa mites, and remove them too.  So it acts as a natural stimulant to the bees' normal grooming behaviour.  I haven't used any chemical controls in either hive this year (though doing the comb change in Miriam's hive will have helped to lower the number of varroa in the hive).  So hopefully this will help a bit in reducing the mite level - which is important, as I don't want the hives carrying too many mites over winter.  Too many mites increases the risk that the colony won't survive, and I want to keep the risk down if I can.

    Normally I will actually pull the frames out and sprinkle the icing sugar onto the surface of the comb, but we were a little short of time and it was starting to get cold, so I decided to just sprinkle the top of the frames.  Hopefully it will still do some good.

And that's it - beekeeping done for another year.  I still have odd bits of maintenance to do over winter though:
  • I need to make some more lifts for the outer walls of the hive, as I haven't enough if both hives make a lot of honey next summer
     
  • I'd like to replace a couple of the supers with new boxes
     
  • I need to make up some new brood frames, so that I am ready to do Caroline's comb change in the spring

Other than that, I just have to wait until the first warm weekend in April.  I'll probably be posting a bit less frequently over the winter, though I do have a couple of articles planned, including one on drones, and also some info about propolis.

I think I've prepared the hives as well as I can, and they seem to be in pretty good shape for surviving the winter.  But I will still be keeping my fingers crossed until that first sunny spring day...

Thursday 22 September 2016

Asian Hornet - Bad News for Bees

Worrying news from Gloucestershire - DEFRA have confirmed the first verified sighting of the Asian Hornet in Tetbury.  That's only 25 miles from here - a little close for comfort.

This is what they look like:


Asian hornets are predators that hunt honey bees, and can pose a risk to colonies - they are capable of killing a weaker colony.

DEFRA have more info here:
http://www.gov.uk/government/news/asian-hornet-identified-in-gloucestershire

Monday 19 September 2016

Feeding for Winter

Regular readers will know that Miriam's bees made plenty of honey this year - and I have left her colony with enough of their own honey for them to have plenty of stores to make it through winter.

But Caroline's bees?  Not so much.  With all the shenanigans of the execution of Florence, and then failing to replace her, they just haven't had the time or the numbers to store much honey.  Unless they get some, they'll run out and starve before spring.  What to do?  Well, feed them, of course!

You'd think that, with all the excess honey Miriam generated, I could just feed that to Caroline's bees.  But you'd be wrong.  Feeding bees honey from another colony can be bad - there is a real risk of disease transfer (not diseases that humans can get - we're perfectly safe.  But there is a risk of transferring American Foul Brood spores, and other nasties).  Actually, the easiest thing is sugar syrup.  Basically, I mix up 1kg of sugar (ordinary white granulated sugar - never brown sugar) with ¾ of a litre of hot water, and then let it cool.

So, once I've got my syrup, how to give it to the bees?  The answer is to use a feeder bowl, which looks like this:


This is basically a covered bowl with a funnel in the middle, and the bees climb up the inside of the funnel and then over to the other side, where they can get to the syrup.  It's easier to see with the lid off:


There's a clear plastic cup over the funnel, which stops the bees floating off into the syrup and drowning.  And at the bottom, I can see some bees trying to get at the last drops of syrup.  In case you've ever wondered, this is what a bee's tongue looks like:


OK, they're hungry - time to fill up the bowl:


As you can see, when I fill the bowl they cluster at the surface of the liquid where they will fill their stomachs with syrup.  They then head back down the funnel into the hive, where they will regurgitate the syrup into cells in the comb so it can be stored for winter.

They have an astonishing appetite too - Caroline's bees are currently taking down 1½ litres of sugar syrup every day!

Friday 9 September 2016

Farewell to Queen Sarah

Don't panic - nothing bad has happened to Queen Sarah, and her colony in the nucleus.  I was recently speaking to Steve, another local beekeeper, who had sadly had his bees wiped out by wasps (have I mentioned that wasps are evil?)

I mentioned that I had the colony in the nucleus, and would he be interested in putting them into his (now vacant) hive?  Indeed he would!

This is good news - I have over-wintered bees in the nucleus before, but I prefer the extra storage space (for storing extra honey) that a hive provides, as it reduces the risk of the bees running out of honey stores in the winter.  So moving Sarah's colony to Steve's full-size hive gives them the best chance of making it through winter - and Steve gets to be a beekeeper again.  Everybody wins!

On Tuesday evening, Steve and I met at the apiary at dusk, secured the nucleus (gaffer tape was involved) and loaded it into Steve's car, ready for him to move the bees into his hive the following day.  If you're wondering why we met at dusk, it's because we needed to wait until all the foraging bees had returned to the hive - otherwise some very confused bees would be wondering where their home had suddenly disappeared to!

So here's a final look at Queen Sarah's colony, and I hope they have a prosperous future:


Wednesday 7 September 2016

SHOP!!!

Exciting news!  Beechen Bees honey is now available to buy from The Deli in Widcombe!

BIG thanks to Nicky at The Deli for her lovely tweet about the new honey.

Head down there now to grab some...


Sunday 4 September 2016

Re-brand and Honey Labels!

Exciting news - Beechen Bees has had a re-design!  Big thanks to Liz from DesignInMedia for coming up with the new logo, as well as the design for this year's honey jar labels.  Here's the new season's label:


I think it looks fantastic - and I've already labelled up the first batch of a dozen jars, which look deliciously tempting:


I've also updated the blog logo to show the new design.  Hope you enjoy the new look!

For more information about Liz and DesignInMedia, please click on the logo:

Saturday 3 September 2016

Miriam's Comb Change

Avid blog readers will remember that earlier this season, I attempted to change the brood comb in hive number 2 (ruled at the time by Florence, now Caroline's hive) - this is something I try to do every year, as it prevents impurities, viruses and spores building up in the wax.  My progress was described here and here.  Then the bees started to make queen cells, and eventually deposed Florence.  Oops.

Part of the problem, I think, was that both colonies were quite small - so my swapping combs around seems to have disrupted the harmony of Florence's hive (though I suspect the bees may have got rid of her anyway).  But it did have the benefit of building Miriam's hive up quickly, which led to my bumper harvest, so it wasn't all bad.

However, I didn't get the chance to change Miriam's comb in the spring, which is when I normally do it.  So, I've decided to do it now.  There are two reasons for this:  firstly, because I need to, as it's now overdue.  But secondly, I've realised that now is actually a better time than spring to change the comb.  In spring the bees are still building up the colony size after winter, and they need to put their energy into raising brood; making new comb is an unwelcome distraction.  Whereas at this time of year, just after the harvest, there are plenty of bees - and now that the supers have been taken off, there's less space in the hive for them.  So it makes sense to add a second brood box, with 11 empty frames, which will give the bees some more space and also give them some productive work to do: building new comb!

So, a couple of weeks ago I put the box of empty brood frames onto Miriam's hive.  Last week, when I inspected, the bees had already drawn most of the comb.  I found Miriam on one of the old brood frames, picked her up (by her wings - very carefully!) and moved her onto the new frames.  There is a gadget called a "queen excluder" that sits between the old and new brood boxes - it's basically a wire mesh, and the spaces in the wires are just large enough to allow worker bees through, but too small for Miriam to squeeze between them.  This means she can't lay any more eggs in the old brood frames, so hopefully she should now be happily laying in the new comb.

I'm going to check on Monday to see how she is getting on...

Thursday 1 September 2016

Introducing Queen Caroline

Today's post is about Queen Caroline, who took over the throne of hive #2 just before 15th July.

She is named after Caroline Herschel, who lived right here in Bath!  For a while anyway - she was actually born in Germany, and also lived in Datchet and Hanover as well as Bath.  Caroline was an astronomer, and the sister of William Herschel (the astronomer who discovered Uranus).

Despite being partially blind in her left eye, as a result of contracting Typhus as a child, Caroline made some important astronomical discoveries.  She was the second woman to discover a comet, and discovered several over her lifetime including comet 35P/Herschel-Rigollet.  She also discovered a number of nebulae that had not previously been observed or recorded.

Caroline's interest in Astronomy began by helping her brother William with tasks such as polishing mirrors and assisting in the assembly of the telescopes that William designed.  However, one of her most significant contributions was in record-keeping, and logging William's observations.  Caroline learned to copy astronomical catalogues that William had borrowed, and add observations that she and William had made.

In 1783 Caroline was recording observations, using John Flamsteed's catalogue to identify stars that were being used as reference points for the nebulae that the Herschels were observing.  Flamsteed's catalogue was organised by constellation, which Caroline found was not an efficient way of indexing the stars.  She therefore decided on a more scientific method, and created her own catalogue organised by north polar distance.

This catalogue, Catalogue of Nebulae and Clusters of Stars, was published by the Royal Society in its Philosophical Transactions of the Royal Society A (though under William's name).  Later, Caroline updated the catalogue;  it was eventually enlarged by John Louis Emil Dreyer and renamed the New General Catalogue.  Objects in this catalogue are identified by the identifier NGC, and many astronomical objects are still identified by their NGC number, including NGC 6543 (the Cat's Eye Nebula) and NGC 4755 (the Jewel Box Cluster).

In 1787 King George III granted her an annual salary of £50 for her work as William's assistant, making Caroline the first woman in England to hold an official government position, and the first woman to be paid for her work in astronomy.  And in 1828, Caroline became the first woman to receive the Royal Astronomical Society's Gold Medal.  She was elected an Honorary Member of the Royal Astronomical Society in 1835 along with Mary Somerville - they were the first women to be admitted.

You can find out more about Caroline Herschel on Wikipedia.

... And here is Caroline's hive, now fully converted to the traditional double-walled WBC design:

Wednesday 31 August 2016

Introducing Queen Sarah

Hopefully you've already read my post about why I name my queen bees.  Today's post is about Queen Sarah, who emerged from her cell sometime before 27th June, and is the queen of the nucleus (the half-sized hive).

Sarah is named after Sarah Guppy, who was was an inventor and engineer.  She was born in Birmingham (as Sarah Beach) in 1770, but moved to Bristol when she married Samuel Guppy in 1795.  She patented a number of domestic inventions, including the fire hood (predecessor to the extractor fan), and a device for a tea urn that would cook eggs in the steam while also keeping toast warm.  I assume that Sarah was a big fan of breakfast...

Possibly her most significant patent was for ‘erecting and constructing bridges and rail-roads without arches or sterlings, whereby the danger of being washed away by floods is avoided’.  It was an improved method of piling for bridges, allowing chains to be passed across the towers to support a road.  Her method was used by both Thomas Telford, for the Menai Suspension Bridge, and Isambard Kingdom Brunel, for the Clifton Suspension Bridge.

Sarah was a friend of Brunel and became involved in the construction of the Great Western Railway, recommending the planting of willows and poplars on railway embankments to stabilise them.  She had 6 children, and her son Thomas Richard Guppy worked with Brunel on the SS Great Western as well as the Great Western Railway.

Sarah was a notable figure in the Bristol social scene and, as well as her achievements as an inventor, was very involved in social reform and philanthropy.  She founded a charity school for girls, and was also concerned with the welfare of female servants, widows and retired seamen.

Yo can find out more about Sarah Guppy here and here.

Wednesday 24 August 2016

Harvest - Update

The new jars arrived, and I have now potted up all the honey.  The final tally was 52½ jars, which at 12oz a jar makes for just over 39lbs.  My best year by quite a margin!

Tuesday 23 August 2016

On Queen Bees, and Their Names

Not every beekeeper names their queen bees.  Some beekeepers have over 300 hives, and at that scale it just wouldn't be feasible (and farmers don't tend to name each of their stock, anyway).

But when you do very small-scale beekeeping, as I do, I think it's nice to be able to identify which queen is doing what, in which hive.  In any case, different colonies exhibit different behaviour, a lot of which is genetically determined, and much of which is determined by the queen - either directly, via the genes that she bequeaths to her worker bees, or indirectly via her pheromones.  So it really is the case that different colonies - and by implication different queens - have different personalities.

I'm not the only beekeeper to name their queens, either.  Two beekeepers I met at Ealing & District Beekeepers - Emily (http://adventuresinbeeland.com) and Emma (http://missapismellifera.com) name theirs after essential oils (Emma is an aromatherapist).  You should check out their blogs by following the links - they really are good.

So, I decided I needed a consistent naming scheme for my bees.  Being something of a nerd (or am I really a geek?) I decided to name my queens after scientists and engineers.  Of course, because queen bees are female, it would be absurd to give them names like Charles (Darwin) or Albert (Einstein).  So, they are of course named after female scientists and engineers.  This has a curious effect - firstly, you start to realise just how many female scientists and engineers there are - and secondly, just how poorly known their names are, given the contributions they have made to human knowledge.

Take for example my first queen - Rosalind.  She was named after Rosalind Franklin, who was a leader in the field of X-ray crystallography, which is a technique for determining the structure of molecules by photographing them using X-rays.  Rosalind's work was crucial in determining the double-helix structure of DNA, for which Watson and Crick, and Rosalind's colleague Maurice Wilkins, were awarded the Nobel Prize in 1962.  Rosalind died in 1958, and sadly was not awarded the Nobel, as it is never awarded posthumously.  This is the most famous picture, photograph 51, which Raymond Gosling (her PhD student) took in May 1952 - it's a photo of an actual strand of DNA:


Regular readers will already know about Miriam, who has produced an excellent honey crop this year.  My two new queens are called Caroline (named after Caroline Herschel), and Sarah (after Sarah Guppy).  In the next two posts, I'll be saying a bit more about them - stay tuned...!

Thursday 18 August 2016

Harvest!

Today was harvest - the day I extracted the honey and filled jars full of the amber goodness!  I covered the detail of the process last year, so click the link if you want to know more...

A very big thank-you to Stewart who, for the second year running, was a huge help with extracting and jarring-up the honey.

I filled 32 jars - and then ran out of jars, with more honey still in the filtration tank.  More jars are on order...!  Meanwhile, here's a picture of what I have so far:

Tuesday 16 August 2016

Why, and How, Does One Mark a Queen Bee?

I have finally got round to marking my new queens, Caroline and Sarah.  But you may be wondering why I do this - and how it's done?

So - why?  Well, marking a queen involves putting a little spot of paint on her thorax, and there are two reasons for doing it.  Firstly, it makes the queen easier to spot.  In Miriam's hive, where there are nearly 60,000 bees right now, if I hadn't marked Miriam with a spot of blue paint last year, then I really wouldn't be able to find her among all the other bees - it would be almost impossible!

Secondly, there is a colour scheme in use by beekeepers, and we use different colours for different years:

  • White, for years that end in 1 or 6
  • Yellow, for years that end in 2 or 7
  • Red, for years that end in 3 or 8
  • Green, for years that end in 4 or 9
  • Blue, for years that end in 5 or 0

This year, 2016, end in "6", so this year's colour is white.  So I need to put a spot of white paint on the backs of Caroline and Sarah.  So - how is it done?  Carefully!

Really, it's one of the more fiddly jobs in beekeeping, and if you get it wrong, you can kill your queen by mistake (BBC broadcaster Bill Turnbull sadly did this once).  So here, in pictures, is how it's done:

Firstly, find the queen!  Here's Sarah, before I marked her:


Then, I needed to put her in a contraption called a "queen cage", which looks like this:


The idea is to place the cage onto the comb, with the queen underneath in the middle, and the sharp prongs can be pushed into the wax, which then holds the cage (and the queen) in place.  Get it wrong (as Mr Turnbull did) and you can accidentally stick one of the prongs straight through your queen bee...

Well, fortunately, I didn't get it wrong, so here's me fixing the cage in place:


The next job is to use a paint pen (we have a handy Art Shop in Bath that sells these) and wait until the queen's thorax is underneath one of the holes in the cage.  And then, carefully dab a dot of paint onto her back:


There we go - all done!  Here's Sarah with her new dot (or smudge...!) of white paint on her back:


The procedure was exactly the same for Caroline - here's a before and after shot of her:


Now, I still haven't explained the reason for naming them Sarah and Caroline.  That will be coming in the next couple of posts...

Finally, a big thank-you to Amelia for taking the photos for this blog post (believe me, photographing bees is not easy!) - and to our cat, Patsy, who probably wanted to help, before she got distracted...:

Monday 15 August 2016

Introducing... Caroline and Sarah!

This weekend I finally did mark my two new queens (the ones in hive #2 and the nucleus).  I'll have further info (with photos) in a forthcoming post.

So, the names are:

  • Caroline (the queen of hive #2),
  • and Sarah (the queen of the nucleus).

Why Caroline and Sarah?  Well, there will be a post coming later this week about that, too...

Friday 12 August 2016

Royal Baptisms - An Apology

So, I was supposed to mark and name my two new queens (#2 and the nucleus) last Sunday, and had dropped heavy hints here in this blog that there would be an update.  Well, that never happened, as you probably noticed...

Everything is fine at the apiary (lots of honey in Miriam's hive).  But I'm afraid I have to admit that the reason I didn't get round to marking the queens, is because I was very hungover.  Sorry about that.

This weekend I will definitely, definitely be marking and naming the queens - I promise!  Until then, here's a picture of a nicely full comb of honey from Miriam's hive:

Thursday 4 August 2016

More News From Hive #2

My last inspection was Saturday, so this really is a bit late...!  The headline news is:  the queen in hive #2 is now laying!  In fact, some of the brood is capped, which means she'd been laying for more than a week already.

This is very good news, as it now means that I can name her.  I haven't yet got round to doing the naming & marking ceremony for the queen in the nucleus, so hopefully this weekend I can do both queens at the same time.  I already have two names in mind...

Monday 25 July 2016

Winter Is Coming (yes, really)

An update on where we are in each of the hives:

The nucleus:  The new queen is laying well.  I'm hopefully going to name her formally next week (watch this space!)

Hive #2:  No idea - I'm still leaving it alone while the new queen "gets jiggy" with the drones (I have a post coming up about that).

Miriam's hive:  When I opened up and started going through the frames, I could see that they were still making queen cells - in fact, they were simply rebuilding the ones that I'd cut out last week in exactly the same places on the frames.  But, interestingly, they were empty - no eggs in any of them.  Or so I thought, until I got to frame number 6.  I found an open queen cell (larva around 5 days old) and removed it.  Then, I saw this:


That is a capped queen cell.  But notice the hole in the side, near the top.  After capping the cell (which would normally be the precursor to swarming) the bees seem to have changed their minds, and nibbled a hole in the side of the cell.  The larva was still inside, but it was only a matter of time before the bees would pull her out and kill her.  This can only mean one thing - the swarm season is officially over, and the bees are going to stop making queen cells until the spring.  They have declared it:  Winter Is Coming.

OK, that may seem crazy - it's July, the sun is finally (mostly) shining, and the schools have only just broken up.  Isn't it the start of summer?  Not in bee world.  From this point on, they have one single focus - build up stores of honey, make sure there are plenty of bees, and prepare to bed down for the long, cold days of winter.  A beehive needs around 40 lbs of honey (that's around 20 kg in pre-brexit money) to get it through the winter, and right now is their prime opportunity to collect it.

So, how are Miriam's bees doing?  Fantastically well, actually.  I keep 10 frames back for them to use as winter stores (which, at around 1.5 lbs per frame means 15 lbs of honey).  And they will store another 25 lbs in the brood box during September.  So, their 40 lbs for winter is already covered - any surplus goes to the beekeeper!  How's that looking?  Well, I have 20 frames that all look like this:


So, as long as they keep at it and we don't have a spell of wet or cold weather, I could be looking at over 30 lbs of honey.  Happy days...

Wednesday 20 July 2016

Small Things

Science warning:  this post contains actual science.  You have been warned...

You'll have noticed I mention eggs a lot in my posts.  There's good reason for this - eggs are important.  For the bees, they are as important as honey - during the first half of the year, they are the basic unit of production for the hive - the colony's GDP.  Without eggs there would be no workers, and no way to replace a lost queen.  And, as I've probably mentioned before, at the peak of the season (right about now, in fact) the queen can lay up to 2,000 eggs a day.

So, what do they look like?  Well - like this:


To give you an idea of scale, here's the same egg with a worker bee in the (out-of-focus) foreground:


This particular egg was laid in a queen cell.  Interestingly, there is actually no difference between an egg that is laid in a queen cell (and destined to be a queen) and one laid in an ordinary hexagonal cell, and destined to be a (female) worker bee.  The differentiating factor is in the feeding.  For the first three days, all bee larvae are fed on royal jelly.  After three days, workers and drones are then fed on a different substance, which is similar to royal jelly, but - crucially - lacks the protein royalactin.

Queens, however, continue to receive royal jelly until their cells are capped.  The royalactin in the royal jelly induces the uptake of epidermal growth factor receptor, which in turn causes changes in cell growth and metabolism as the larva develops - which is why she becomes a queen instead of a worker.  It's all controlled by the gene PI3K/Akt, which is a signalling gene - this means it has the ability to switch other genes on or off, depending on the cellular chemistry (increase in epidermal growth factor receptor in the case of queen bee larvae).

Drone (male bee) eggs are different, though.  They look the same, but internally they only have one set of chromosomes because they are unfertilised (fertilised eggs have a set of chromosomes from the mother, and also a set from the sperm that fertilised them).  This means that, peculiarly, drones have no father...!

A question I inevitably get asked is - do I get stung?  Well, unfortunately yes - though not every time I open up a hive.  It's just something you get used to, if you decide to become a beekeeper!

I remembered to take a picture of a sting when I was stung recently - here it is:


Stings are quite interesting structures.  A sting is actually a modified ovipositor - this is a narrow tube at the end of a female bee's abdomen (wasps have them too), down which the egg travels from the ovary when it is laid.  In a worker bee, who doesn't lay eggs, the venom travels down the sting from the venom sac (inside the abdomen).  The sting in worker bees is barbed, which is why it gets stuck in your skin when a bee stings you - and gets left behind when the bee flies off (and dies, unfortunately).

The queen bee also has a sting, but very rarely uses it.  It's mostly used for killing rival (sister) queens, often when they are still in their cells waiting to emerge (she will nibble a small hole in the side of the cell, and then sting her sister through the hole).  Queen bee stings are not barbed, so she can sting multiple times and still live to fight another day.

Because a sting is a modified ovipositor, which is a structure for the female activity of laying eggs, male bees (drones) don't have them.  So if a drone ever lands on you, don't panic - he can't sting you!

Monday 18 July 2016

Update: Miriam's Hive

Yesterday, I finished off checking Miriam's hive, and dug out another couple of queen cells.  I also double-checked the frames that I inspected yesterday - and a good thing, too;  the bees had already re-built three of the cells that I cut out yesterday, and two had eggs in (which I removed).  I'm going to have to keep an eye on them for at least a couple more weeks, yet.

One of the queen cells I cut out was capped - and I nearly missed it, because the bees had built it right on the bottom of the comb, next to the bottom bar of the frame.  Because of the awkward position, they'd had to curve it round to the side, so it looked at first glance like a drone cell.  I had to have a really good look before I realised it was definitely a queen cell.  Lucky I spotted it when I did, or the bees would have almost certainly swarmed today or tomorrow!

I thought it would be interesting to open it up and take a look, as it shows a stage of development that I didn't cover in my recent post on Queen Bee Larvae.  This is the fully-grown larva after the cell has been capped, but before it goes through metamorphosis - at this point it is probably around 9-10 days old:

Sunday 17 July 2016

Too Much of Good Thing...

Yesterday's inspection started well.  Firstly, there was no need to open hive #2 at all (the new queen will be spending the next fortnight, ahem, 'entertaining' gentleman callers).

The nucleus only needed a quick inspection - the new queen is laying plenty of eggs, and everything looks fine.

So, onto Miriam's hive.  Getting the new outer walls off was a little tricky, as they'd stuck together at the joints because of the paint.  A bit of gentle brute-force dealt with that.

Inside, the bees are still making queen cells, though I think there are fewer this week.  But what there is noticeably a lot of, is bees.  OK, this shouldn't be a surprise, it's a beehive - of course there are lots of bees, right?  But really, Miriam has done a cracking job of laying plenty of eggs (2,000 a day!) and it's getting very busy inside her hive now.

So, I was having to find queen cells and cut them out again, which is slow work, because I needed to be sure I'd cleared each frame before moving onto the next one.  And there are so many bees on each frame now that it's very easy to miss a queen cell, as it could be hidden under a cluster of bees, or in the corner of the frame.  I worked methodically along, clearing frame number one, then two, three, four, five...  It seemed to be getting more difficult as each frame seemed have more bees than the last one.  You will normally never hear this complaint from a beekeeper, but - dammit, there are too many bees!

While holding the sixth frame, I was wondering why there seemed to be twice as many bees as when I started.  Then I realised - since I'd started the inspection, thousands of foragers had returned to the hive, expecting to deposit their nectar into the honey frames in the supers.  But of course I'd taken the supers off to inspect the brood box.  So the bees were just gathering in the brood box, with nowhere to go.  How many?  This many:


It had got to the point where I couldn't get my fingers far enough into the hive to lift the frames out.  And putting the frames back was a devil's job, as bees kept getting stuck under the frame lugs.  I decided to admit defeat, stop halfway, and carry on with the other half of the brood box today.

I also saw that the supers were getting quite full with honey now, and realised the bees were running out of space.  So I added another super, and then closed up.  The hive is getting quite tall, now!


Friday 15 July 2016

What News from Hive #2?

I know that the queen cell in hive #2 should have hatched around the middle of this week - so I decided to pop down to the apiary today and see if I could see the new queen.

It was fairly overcast as I took off the roof, crown board and queen-excluder.  And then, just as I was separating the frames... it started raining.  So I quickly had to put the hive back together and wait it out.  Fortunately, it was only a brief shower, so 10 minutes later I was able to open up again.

I don't like having to put a hive back together in a rush - it's very difficult to avoid crushing some of the bees between the hive components.  As I took off the roof and crown board I could see that I'd accidentally squashed 5 bees in my haste to rain-proof the hive.  I really try hard not to harm any of my bees, so this made me a little sad.  However, I had to get on with the job in hand, as there was no way of knowing when the next rain shower would arrive.

I separated the frames and lifted out the frame bearing the one (very large) queen cell.  I looked at the end, and was immediately concerned - the end of the cell was still in place.  I know that this queen cell is more than 16 days old, and queens don't emerge late.  Had something gone wrong?  Had she died during metamorphosis?  Maybe a varroa mite had sneaked in just before the cell was capped?

I turned the frame to get a better look, and what I saw next was alarming - there was a large hole in the side of the queen cell, and I could see that the workers were chewing away at the edges, so that they could dismantle the cell.  So, perhaps she had died - and they had chewed a hole in the side of the cell so they could remove her from the hive?

While still holding the frame, I started thinking about what I needed to do next.  Do I put in another frame of eggs, wait 16 days and hope for 3rd time lucky?  Do I try to combine with the colony from the nucleus, and hope they accept the queen from that colony?  Do I accept that these bees just can't raise a queen, give up on this hive, and start again in the spring?

And then... I saw her!  A lovely new queen, with a long, striped abdomen and big ginger legs, awkwardly making her way across the comb to meet-and-greet her new subjects.  I cannot tell you how relieved I am to see that the succession has finally been secured!

I closed up the hive, and promised myself that I will leave her alone to get on with the important job of "entertaining" the local drones...  I'll check on her again at the end of the month, to see if she has started laying.

Thursday 14 July 2016

Queen Bees - Stages of Development

It's the time of year when bees turn their attention to reproduction, and that means making new colonies.  This is why bees swarm - basically, the colony splits into two, with half staying at home, and the other half flying off with the queen to make a new home - this is the swarm.

Now, every colony needs a queen, so what do the "stay at home" bees do, if their queen has just departed with the swarm?  Simple - they make one!  Actually, they're quite pro-active - so they will start making new queens before the swarm - 8 or more days before, in fact.  The colony will make one one more queen cells, and the queen will lay an egg in each one.  The egg then hatches, and the workers feed the growing larva on royal jelly for 7 days.  On the 8th day, they close the end of the queen cell with wax.  And somehow, they know that once there is a closed, complete queen cell, it's show-time - and at any moment from the 8th day, as long as it's warm and sunny, they will swarm.

Then, 16 days after the egg was laid, the new, fully-formed queen will nibble her way out of the cell, and take her new position in the hive.

It's interesting to look at the development of the queen cell and the larva within.  Here are two queen cells - the one on the left was started a couple of days earlier than the one on the right.  Notice that, unlike worker bee cells, they are not horizontal with the opening at the side, but vertical, with the opening at the bottom:


Here's what they look like from below - notice how the larvae look like curled-up maggots:


Here's a cell that I cut out of Miriam's hive on Saturday.  From the length of it, I would estimate it to be 6-7 days old.  Lucky I got to it on Saturday, or by Tuesday they would have swarmed!  The opening (which was at the bottom of the cell) is to the right of the picture:


Looking at the same cell, but from the top (which broke open when I removed the cell) you can see the larva:


This next cell is a different one, which I cut out of hive #2 on Saturday.  It is closed at the bottom, and probably 12-13 days old.  We are actually looking at this cell from the top (again, the top broke open as I removed the cell).  The white bit you can see is the developing queen's abdomen - she forms in the cell with her abdomen at the top, and her head at the bottom:


In this last picture, I have opened up the cell so that you can see the whole queen.  You can see that she has almost finished metamorphosis - her legs are fully formed, and segmentation of her body into head, thorax and abdomen is almost complete.  However, her body is still soft - her exoskeleton has not yet formed, and her eyes have not finished developing.  If I'd left her in the hive, she would have completed development in around 3-4 days:

Wednesday 13 July 2016

Project 2 - Hive Upgrade

Miriam's hive was something of a utilitarian affair, in that it was using a hive design know as the "British National Hive".  This is a design that has been used very successfully in the UK, and even had a British Standard (BS 1300:1960 - withdrawn in October 1984).  If you need a reminder, Miriam's hive looked like this:


Now, you probably think a "proper" beehive should look like this:


... and you would, of course, be right!  This is a hive design known in beekeeping circles as the "WBC", which stands for William Broughton Carr - the name of the chap who invented this design.

The key difference from the British National is that the WBC hive has a second, outer wall.  This is constructed from sloping-sided boxes that interlock - these are what give the WBC its characteristic "zig-zag"-shaped profile.  The second wall is supposed to provide additional insulation (it works very much like the cavity wall in your house) which should help to keep the colony warmer during winter.  So, as well as looking like a "proper" beehive, it actually provides a better home for the bees.

In fact, internally the hives are almost identical - so much so, that it is actually possible to convert a National into a WBC, simply by adding the external boxes and changing to a wider roof.  So, I thought I'd have a go...!

The first and most important job was to build and paint all the external boxes (known as "lifts").  This was a winter/spring job - here they all are, stacked at the apiary, ready for use:


Next, I needed to adapt the hive stand, so that I could stack the lifts around the existing hive boxes.  A National hive stand is 18" square, while the WBC lifts are a little over 20" internally at the bottom, with an internal rim that the lift sits on.  So, starting with the basic stand:


I screwed two 20" lengths of 3" x 1" planks to the sides of the stand:


... and an 18" length of 1" x ¾" batten at the back (the reason it's only ¾" deep and not 3" is to leave space for me to insert/remove the varroa tray):


Then, I needed to cut two fiddly bits that create a snug fit at the front (these stop the bees sneaking round the sides, when the entrance sliders are in place):


... and finally, paint the stand white, add the lifts and put the roof on top:


Finished - one very smart looking WBC hive!

Oh - and if you don't know why it's painted blue, black and white - then you're probably not from round here, are you...?  :-)